How to burn an Audio CD?
Introduction.
Audio CD is one of the most popular formats (and media types) for storing music. Being there for about 30 years (the first prototype was demonstrated in 1976), it is readily supported by the market. There are numerous CD players, portable players, Hi-Fi systems, car radio players that support the Audio CD format. Almost every music album is distributed by selling Audio CDs now.
To create an Audio CD yourself (or convert MP3 to CDA), you need a CD/DVD burner device (almost every computer nowadays is equipped with such devices), an empty CD-R disc (CD-RW would be good, too), and a special piece of software. We will use Audio CD Burner Studio to burn an Audio CD quickly and easily. The program also support CD-Text, which allows showing information about artist, album, title of the song on the display of your hardware CD player.
Step 1: Download and install the program.
Download Audio CD Burner Studio to a known location. Run the setup and follow its instructions.
Step 2: Start the program. Add audio files to burn.
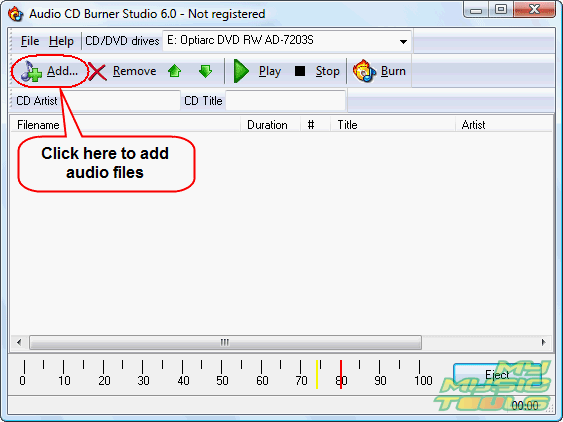
Launch Audio CD Burner Studio. The program has a pretty simple interface:

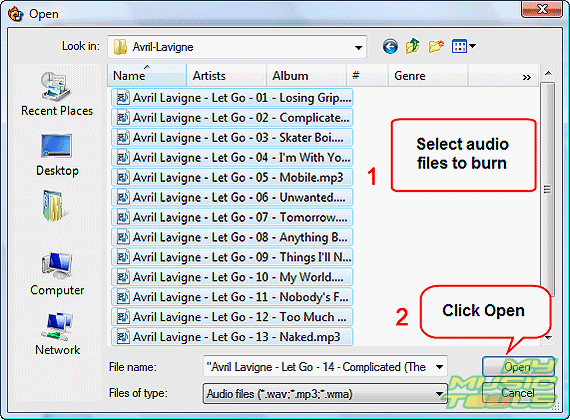
Click "Add" on the toolbar to get a usual "Open" dialog:

Select files that you want to burn to the Audio CD. A typical CD-R disc may contain up to 80 minutes of audio.
Click "Open" to add the files.
Step 3: Burn Audio CD.
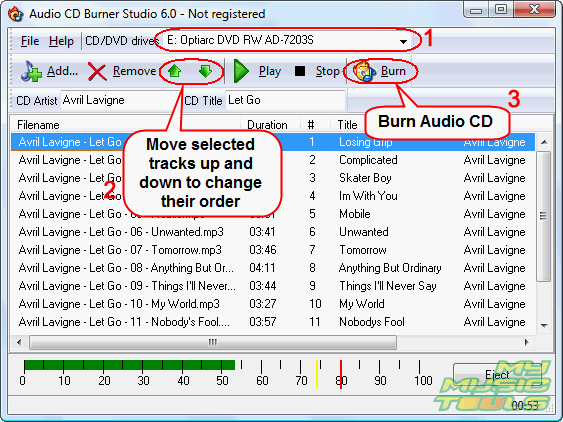
Now the main window is populated with the added files:

If you have more than one CD/DVD burner device in your system, select the one you want to use from the "CD/DVD drives" dropdown list (1). All devices are detected by the program automatically.
Now, take a closer look at the list. The program reads ID3 tags of your music files and will save them automatically to the CD-Text field of your new Audio CD. This information will be then displayed by all hardware players that support CD-Text, which is very convenient. Without CD-Text you get your tracks represented as "Track 01", "Unknown artist" etc.
You can change the order of your tracks by moving them up and down (2). Just highlight a track by clicking on it and use the corresponding buttons on the toolbar to move the track to its position.
Finally, make sure that a blank CD-R (CD-RW) is inserted and click "Burn" (3) to start burning the Audio CD.

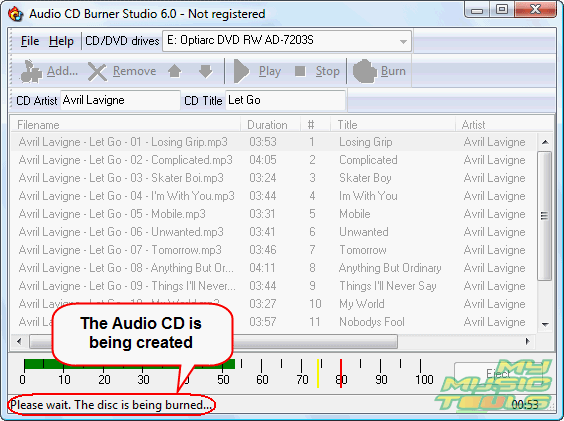
All controls of the program become inactive, and Audio CD Burner Studio starts working. If you see no activity in your CD/DVD burner for some time, don't worry. The program just needs to prepare your audio files for burning, which takes a while.
Finally, the program finishes its job. Now you can take your newly created Audio CD and use it in any hardware CD-player.
The trial version of Audio CD Burner Studio can be tested without restrictions for 30 days.
Search
Related
Ask our expert
- How to share screen videos online?
- How to sort duplicate music files by ID3 tags?
- How to get quick updates on movies by director?
- How to convert multiple MIDI files into an MP3?
- How to rotate videos?
- How to convert WMA to WAV?
- How to play MIDIs on an iPhone?
- How to split an audio file into equal parts?
- How to split m4b audiobooks into chapters for free?
- How to convert videos for You Tube?


