How to convert WMA to MP3?
Introduction.
WMA stands for Windows Media Audio. It is an audio compression technology developed and introduced by Microsoft, and thus WMA is quite popular on computers running Windows operating systems. WMA files can be played by Windows Media Player that automatically downloads necessary codecs, if needed. In fact, there are four basic codecs that can be used for WMA files: the original WMA, WMA Pro, WMA Voice, and WMA lossless.
Due to their popularity, WMA files often can be downloaded from the internet. Unfortunately, many portable players don't support this format, so if the user wants to transfer downloaded music or audio books to his or her player, the audio should be converted to a more widely supported format. For example, to MP3.
You can convert WMA to MP3 with a program like AudioConverter Studio.
Step 1: Download and install the program.
Download AudioConverter Studio to a known location. Run setup and follow on-screen instructions to install the program.
Step 2: Start the program. Open WMAs to convert.
Launch AudioConverter Studio. By default, the program starts in the Wizard mode. If you don't see any welcome window from the wizard, press "Ctrl" + "W" on your keyboard, or select "File" - "Show Wizard".
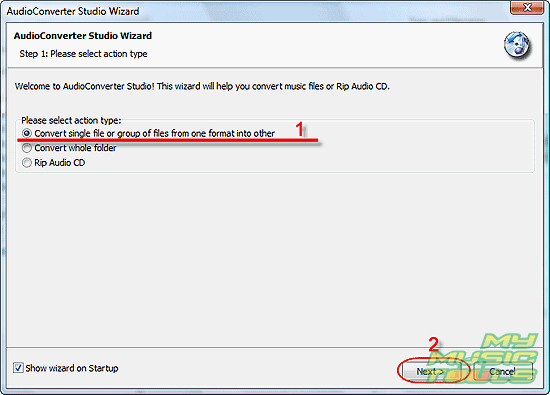
Choose to convert a single file or a group of files (1), click "Next" (2).
A usual "Open" dialog will pop up. Browse to the folder where you keep your WMA files, select ones that should be converted to MP3.
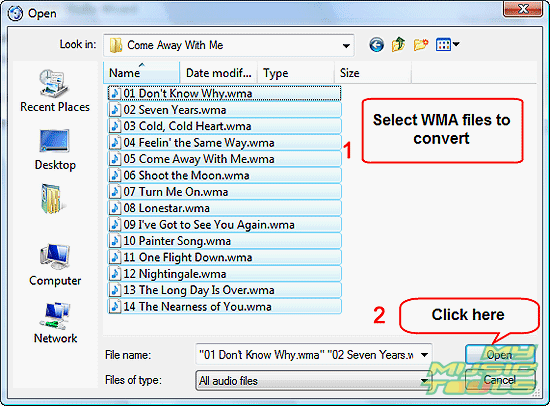
Click "Open". The window closes itself, and the selected files are added to the conversion list of the WMA converter.
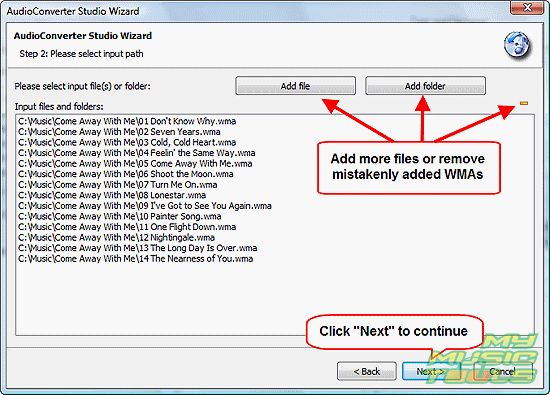
You can add more files (folders with files), or remove mistakenly added files from the list (just select a file and click the yellow minus). If everything is correct, click "Next" to continue.
Step 3: Select output folder and filename format.
As next, AudioConverter Studio offers you to set up two things: output folder and filename format.
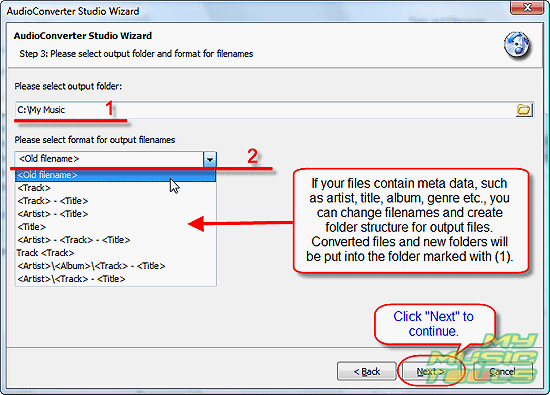
Output folder is the folder where converted files (MP3) will be saved. You can enter a path directly into the "Output folder" field (1), or use the button with the folder symbol (on the right) to get a usual "Browse" dialog.
Filename format is a special feature of AudioConverter Studio. If your source files contain some tag information, like title, artist, album, year etc., the program can use this information to rename and organize your files (i.e. sort them into newly created folders). If not sure, use the "Old filename" format, which is default.
Click "Next" to continue.
Step 4: Set output format and quality.
On the next page, select MP3 from the "Output format" dropdown list to set it as output format (we convert WMA to MP3).
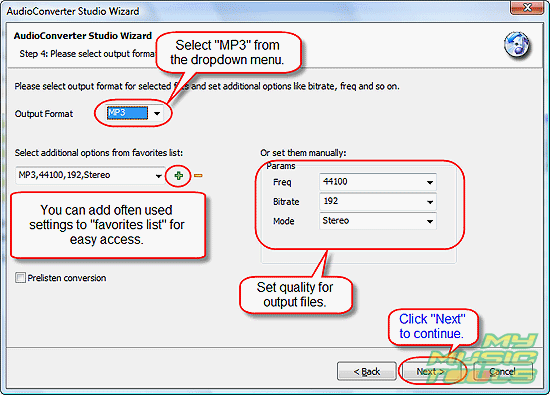
Here, additional options can be also adjusted, such as frequency, bitrate, mode. The program supports the whole range of MP3 bit rates and sample rates. Higher frequency and bitrate mean large file sizes, and vice versa.
We leave the "Prelisten conversion" checkbox unchecked. Prelisten conversion means that only a few seconds of each song will be converted for previewing.
Click "Next".
Step 5: Verify settings. Convert WMA to MP3.
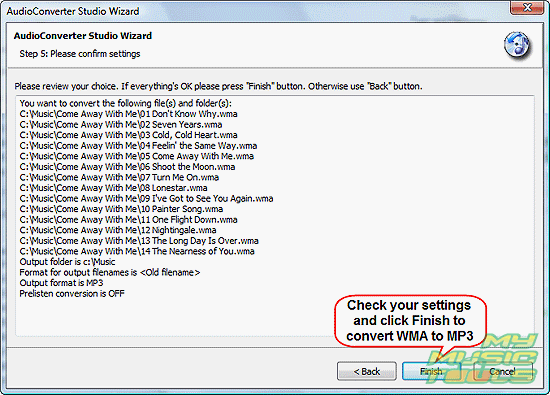
The last page of the Wizard shows a summary. Check if everything is correct. Finally, click "Finish" to start converting WMA to MP3.
The trial version of AudioConverter Studio can be tested for free for 30 days, starting from the first launch.
Search
Related
- How to convert WMA to WAV?
- How to convert FLAC to WAV?
- How to convert APE to FLAC?
- How to rip Audio CD to APE?
- How to rip Audio CD to FLAC?
- How to convert MP3 to WAV?
- How to convert WMA to MP3?
- How do I convert MPC to MP3?
- How to change bitrate of MP3 files?
- How to convert WAV to MP3?
- How to convert CDA to MP3?
- How to convert OGG to MP3?
- How do I convert APE to MP3?
- How do I convert FLAC to MP3?
- How to convert a whole folder of audio files into the OGG format?
- AudioConverter Studio 6.0 review
- AudioConverter Studio review
Ask our expert
- How to share screen videos online?
- How to sort duplicate music files by ID3 tags?
- How to get quick updates on movies by director?
- How to convert multiple MIDI files into an MP3?
- How to rotate videos?
- How to convert WMA to WAV?
- How to play MIDIs on an iPhone?
- How to split an audio file into equal parts?
- How to split m4b audiobooks into chapters for free?
- How to convert videos for You Tube?


