How to edit video and burn it to DVD?
Introduction.
There are many things that you can call a "video editing": cutting or trimming video files, merging video fragments, adding text, applying various video effects, and so on. Some of the things are easier to do than others. You can find a program that would solely split video files, without providing any additional functionality. Another program would join video files. Video splitting and joining are comparatively simple examples of video editing.
Video effects are somewhat more tricky to add, but they also provide more fun. Consider having a bunch of home-made video fragments recorded with a digital camera. You can simply join them together in order to get a movie. But, even combined, they remain what they are, a bunch of separate video episodes.
To give your movie a bit more professional look, you may add various video effects. Want to see scratches on your video, like in some old movie? Imitate drops of rain? Fire? Blur? Night vision effect? Wave?
These effects are examples of advanced video editing. However, you can easily master them with a user-friendly video editor, like the one in Blaze Media Pro.
Blaze Media Pro is an all-in-one solution for audio and video files. It can record, convert, edit, play and burn both your audio and video files. It can extract audio from movies, cut out unwanted fragments of videos, apply adjustable video effects, convert video from one format to another etc. It is especially valuable for our theme, because it can both edit video and burn it to DVD.
Step 1: Download and install the program.
Download Blaze Media Pro to a known location. Run the downloaded setup package and follow on-screen instructions to install the program.
Step 2: Start the program. Edit your video.
Launch Blaze Media Pro. The main window looks like a media player, and that's what it is:
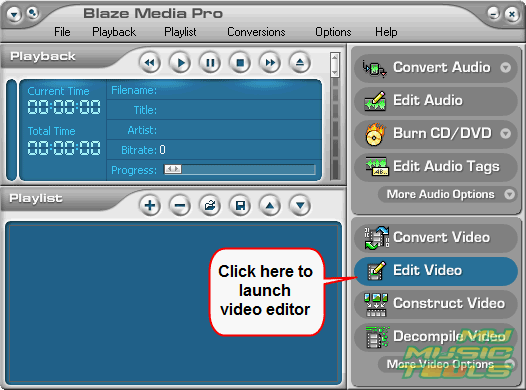
Click "Edit Video" on the right pane to launch the video editor.
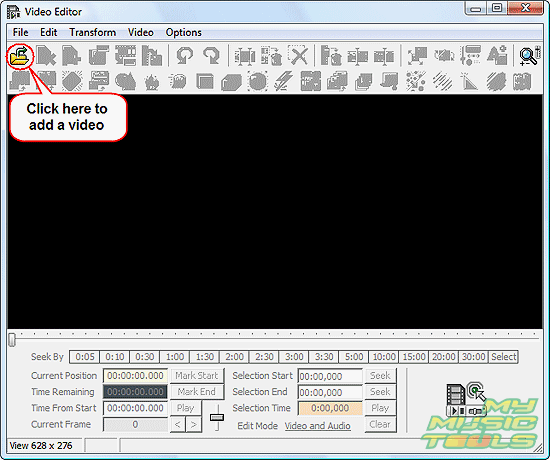
In the new window, click the leftmost button on the toolbar. This will invoke a usual "Open" dialog, where you can browse and select your video files. Blaze Media Pro supports AVI, WMV, ASF, and MPEG (MPG, MPEG, MPE) video formats.
If you want to join several video fragments, open the one that should be first.
After the file is loaded, buttons on the toolbar become active. Now you can edit your movie by adding more fragments, removing fragments that you don't need, applying different effects.
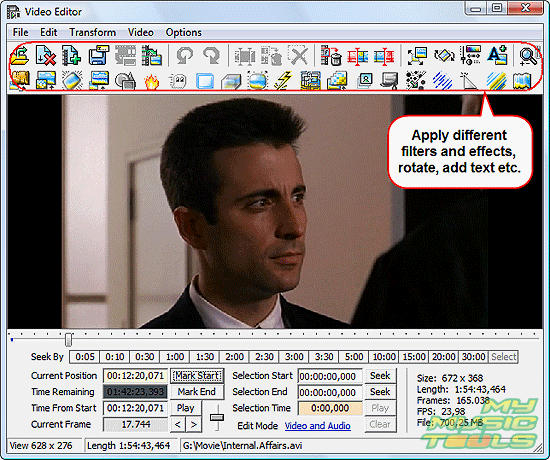
Place your mouse cursor over a button on the toolbar to see its description. Click a button to adjust and apply its effect to your video.
This editor can also be used to split video files, remove unwanted fragments, adjust color setting etc.
Step 3: Save changes in your video. Prepare it for burning.
When you are satisfied with your video, click this button on the toolbar:
![]() , or click
"File" - "Save as".
, or click
"File" - "Save as".
The following window will be shown:
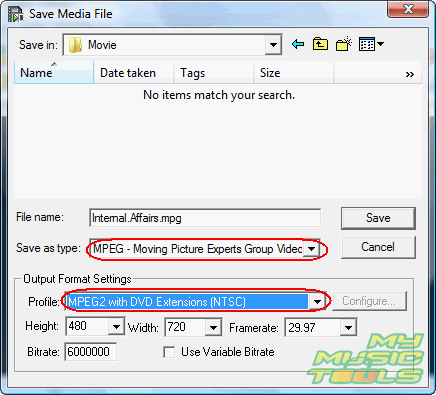
Now, we wanted to burn a Video DVD. So, let's save our video in a format that is suitable for burning.
From the "Save as type" dropdown list, select MPEG.
The output format settings area offers us a number of ready-made profiles, so we don't need to configure everything manually. If not sure, just look for a profile with the keyword "DVD".
After you click "Save", the program will start converting your video into the selected format. It may take some time, depending on your hardware.
Step 4: Burn Video DVD.
Now we will use another built-in utility of Blaze Media Pro. In the main window, click "Burn CD/DVD", then select "Burn Video DVD" from the dropdown list.
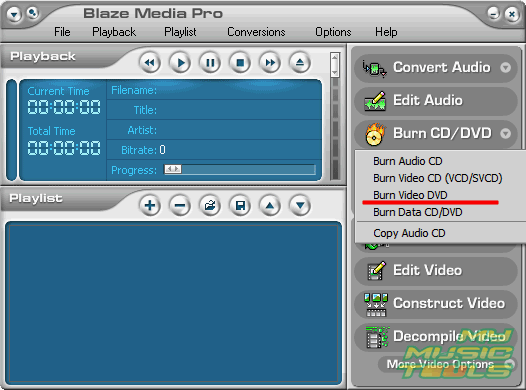
This will open a new window.
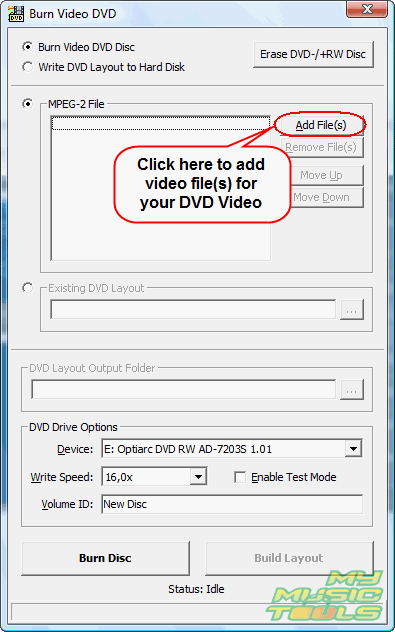
Choose to burn Video DVD, then select the video file you prepared at the step 3. It will appear in the list.
Adjust DVD drive options, if needed. Insert an empty DVD. Finally, click "Burn disc".
The trial version of Blaze Media Pro works without limitations for 15 days of the evaluation period.
Search
Related
Ask our expert
- How to share screen videos online?
- How to sort duplicate music files by ID3 tags?
- How to get quick updates on movies by director?
- How to convert multiple MIDI files into an MP3?
- How to rotate videos?
- How to convert WMA to WAV?
- How to play MIDIs on an iPhone?
- How to split an audio file into equal parts?
- How to split m4b audiobooks into chapters for free?
- How to convert videos for You Tube?


