How to record a CD?
Introduction.
Today's development of flash memory type data carriers evolves quickly. It has almost driven out optical drives when it comes to data transfer from one device to another. However, if you'd like to create a long term storage of your data or some kind of backup, flash drives turn out to be inappropriate. CDs and DVDs still hold their positions because of their cheapness. Buying flash memory for keeping data is too expensive compared to optical disks that cost as much as a piece of plastic. In this article we will discuss how to record a CD containing data, music, or videos. For this purpose we will use a program capable of recording any kind of CD, DeepBurner Pro.
Step 1: Download and install the program.
Download DeepBurner Pro to a known location. Run the setup and follow on-screen instructions to install the application.
Step 2: Start the program. Select project type.
Launch the CD recorder program. The Wizard window will be shown:
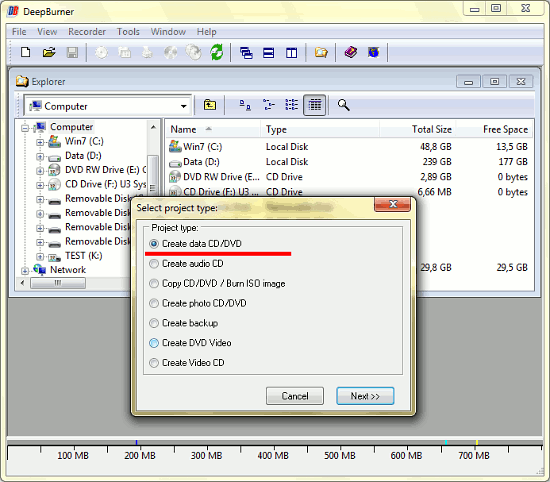
At this point, select what kind of CD has to be recorded. Any CD or DVD type burning is possible. Let's record to a CD some files for their further safe storage on our shelf. We pick the "Create a CD/DVD" option and click "Next".
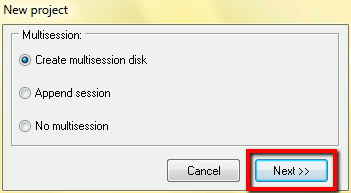
Now we are prompted whether to create multisession disk or not. If you start a multisession, you will be able to record more files to the same CD later. This is useful if the files that you want to record right now occupy only a portion of the CD's capacity, and you intend to add more later. As an example you can take digital photo albums when you add more and more pictures to the CD after weeks or even months. For our task, multisession CD would be great, too: we can record some data today, but if we forget something, there will be no problem to add missing files to the CD tomorrow using the "Append session" option. So we simply confirm the default "Create multisession disk" option and click "Next".
Note: As for the multimedia discs created for media centers or DVD players, it is better not to create any multisession, as many of these devices cannot read multisession CDs and DVDs. If you record a CD for such a device, use the third option ("No multisession").
Step 3: Getting ready. Recording the CD.
Finally we see the main DeepBurner Pro working area:
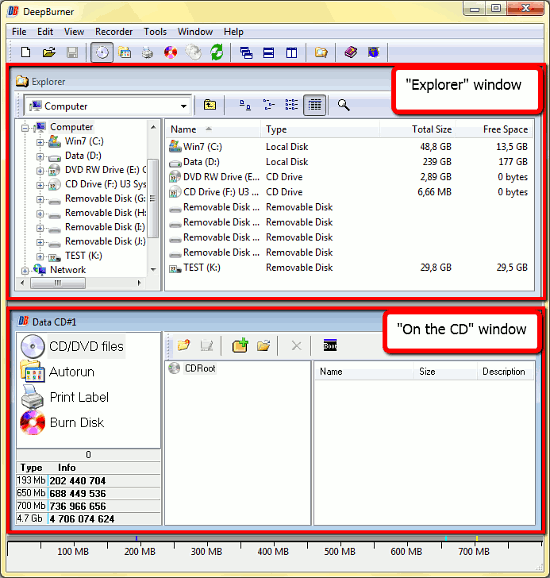
The program window is divided into a couple of areas, the standard Windows Explorer view and the CD view. The upper area shows what is stored on our PC, the lower one shows what is to be recorded to our CD. At the bottom of the general program window, the "data capacity" scale is shown. It reflects how much info you can add to the CD, and how full it is.
The "Explorer" area at the top is self-explainable and familiar, so let's take a closer look at the lower area. Its right part is similar to Windows Explorer as well, but on the left we see four categories. The first one is selected: "CD/DVD files". It shows what files are already recorded on the CD or DVD, in our case there are none. The second category, "Autorun", is recommended for experienced users and can be used to create autorun splash screens shown when you insert the CD. We don't need this for our task, so just skip it. "Print label" category allows us to make a cover for the disc with some notes or pictures, but we don't need this for our simple purpose either. The last "Burn disk" category is used in the final step of preparing the CD to record. Four easy steps, two of them we just skip.
Firstly, let's find the files we want to record to a CD in the upper "Explorer" area. Simply navigate as you would do in Windows Explorer. Select your files:
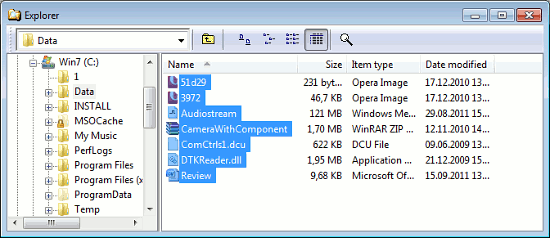
After this, just drag and drop them with your mouse into the lower "On the CD" area (the "CD/DVD files" category should be selected):
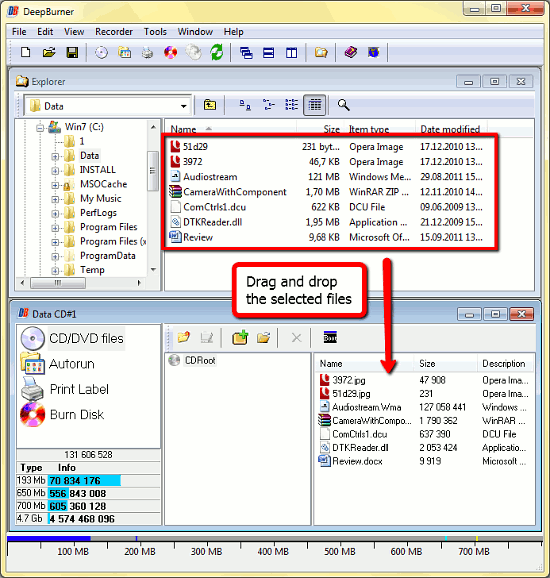
Now we see all of the files in the list ready to be recorded. The "CD capacity" scale on the bottom indicates that we have used about 125 MB of the 700 MB CD space. You can search for more files to burn in the upper area and drop them to the lower one. After adding all files click the "Burn disk" category.
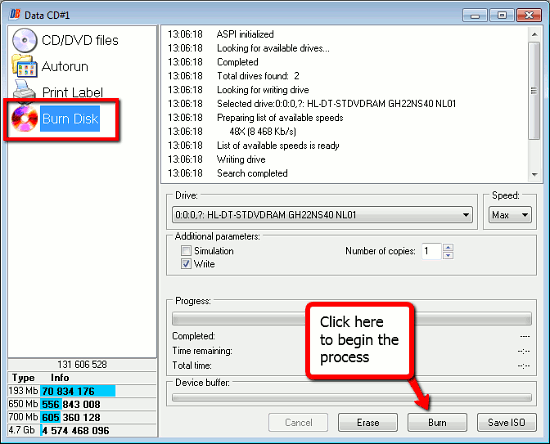
This is the final step before recording the CD. Here you can select the CD drive to use, adjust such options as the number of copies, writing speed and some additional parameters. If you use a rewritable CD-RW disc and it is not empty, you can erase it with a click on the corresponding button. Finally, simply click "Burn" to record the CD.
Search
Related
Ask our expert
- How to share screen videos online?
- How to sort duplicate music files by ID3 tags?
- How to get quick updates on movies by director?
- How to convert multiple MIDI files into an MP3?
- How to rotate videos?
- How to convert WMA to WAV?
- How to play MIDIs on an iPhone?
- How to split an audio file into equal parts?
- How to split m4b audiobooks into chapters for free?
- How to convert videos for You Tube?


