How to split APE files?
Introduction.
The APE format is also known as Monkey's Audio. It's a lossless audio format widely used for storing music. No data is discarded in the process of encoding, which is an advantage over MP3 and other lossy formats. On the other hand, APE files are much bigger than their MP3 counterparts.
Quite often a single APE file contains a complete music album. You may want to split such APE into individual tracks.
This can be done with Visual MP3 Splitter & Joiner.
Step 1: Download and install the program.
Download Visual MP3 Splitter & Joiner to your computer and start the file. Follow instructions of the setup wizard to install the audio splitter to your computer.
Step 2: Start the program. Open an APE file to cut.
Lauch the audio splitter. Its main window will appear:
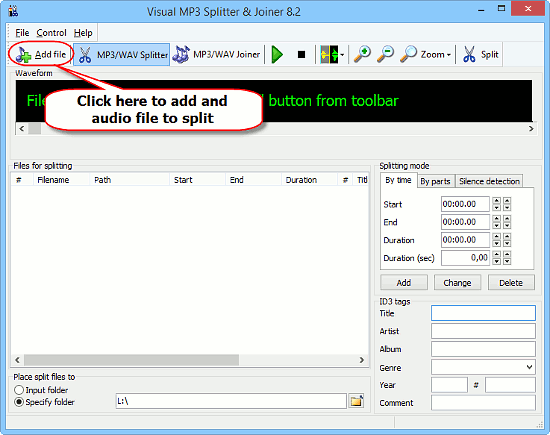
Make sure that the "MP3/WAV Splitter" button is depressed (there is also a joiner mode), then click the "Add file" button on the toolbar.
A typical "Open file" window will pop up:
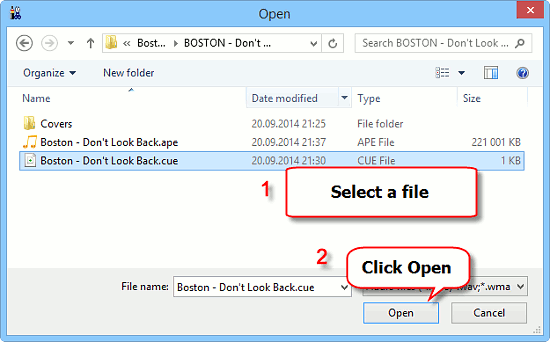
Browse to the location where you keep your APE files, select the one you want to split and click "Open".
In our example, the APE file comes with a small CUE file, which has the same name. This CUE file contains a description of all tracks inside the APE album. Visual MP3 Splitter & Joiner can handle such CUE files, so we open the CUE file instead of APE.
If you do not have any CUE file, just open your APE.
Step 3: Split APE.
Visual MP3 Splitter & Joiner will start loading the APE file:

Even though we opened CUE instead of APE, the program works with the APE file.
The message above tells us that our APE file is being converted to WAV. WAV is another lossless audio format, so this sort of conversion is harmless.
Finally, our APE file is loaded, and tracks are marked for splitting, using information from our CUE file:
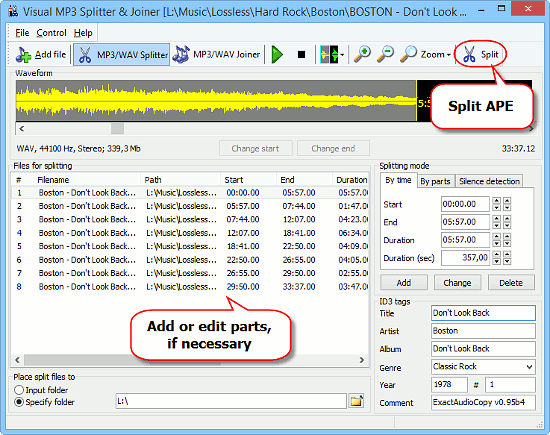
We can readjust parts manually, if there is any need (but usually CUE files contain correct information).
Click the "Split" button on the toolbar to extract and save individual tracks. The tracks will be saved as WAV files in the location that you specify at the bottom of the window.
Further Information
If there is no CUE file, you may specify tracks manually. This can be done in several ways:
- Visually on the waveform.
- By entering start/ end time on the "By time" tab in the "Splitting mode" area.
- By specifying the number of parts / size / time on the "By parts" tab.
- Automatically, using silence detection.
You can find the "Splitting mode" area on the right:
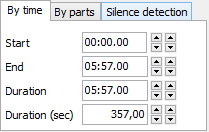
After selecting some splitting method, click the "Add" button below this area to create parts.
If you prefer to select parts by clicking on the waveform, you can use two methods:

"One-click split" is default. If you click the waveform with this method enabled, Visual MP3 Splitter & Joiner sets a "splitting point" at that spot. After this, you can click the "Split" button and get two parts cut at the point where you clicked.
"Precise marking" requires more steps, but allows you to define tracks more precisely. Furthermore, with this method, you can extract overlapping parts.
The free trial version of Visual MP3 Splitter & Joiner can extract up to 5 tracks in one pass. If you like the program, you can register it and remove all limitations.
Search
Related
- How to split an audio file into equal parts?
- How to join WAV files?
- Easy MP3 Joiner 5.0 - Merge Your Audio Easily
- How to split APE files?
- How to create MP3 ringtones?
- How to merge MP3 files and keep the original quality?
- How to split WAV by CUE?
- MP3 splitter with batch mode support
- How to join MP3 files?
- How do I create a CUE sheet?
- How do I split MP3 file using silence detection?
- How do I cut MP3 album using CUE sheet?
- Easy MP3 Cutter 2.4 review
- Visual MP3 Splitter & Joiner 5.1 review
Ask our expert
- How to share screen videos online?
- How to sort duplicate music files by ID3 tags?
- How to get quick updates on movies by director?
- How to convert multiple MIDI files into an MP3?
- How to rotate videos?
- How to convert WMA to WAV?
- How to play MIDIs on an iPhone?
- How to split an audio file into equal parts?
- How to split m4b audiobooks into chapters for free?
- How to convert videos for You Tube?


