How do I record a meeting?
Introduction.
You can record a meeting in several ways: using a dictating machine, a computer with a usual sound recorder software, or a computer with a special program created to record conferences. Here we will discuss a program that falls into the latter category, Minutes of Meeting Recorder. Benefits of using it are quite obvious: you can record and take notes at the same time and store everything in one place. Thus, after the recording is complete, you will get not only the complete audio feed but also your own summary of the meeting (can be easily exported to popular formats or printed).
Step 1: Download and install the program.
Download Minutes of Meeting Recorder to a known location. Run the downloaded setup and follow its instructions to install the program.
Step 2: Start the program. Fill in the meeting information.
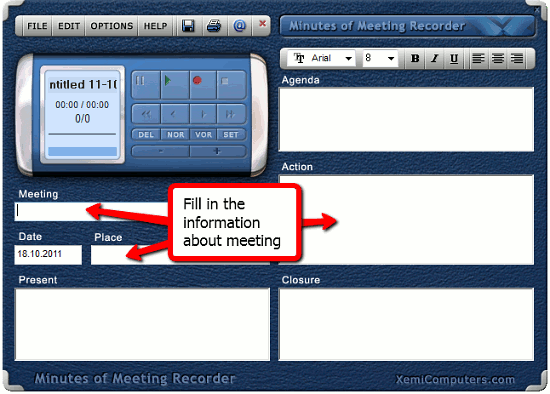
Launch the conference recorder. The main window will be shown:

As you can see everything is simple: just fill in the information about the conference, its place, date and short summary, and you can start recording right away. But we will look a bit deeper and see what additional features we can get from this meeting recorder.
Step 3: Set the conference recording options.
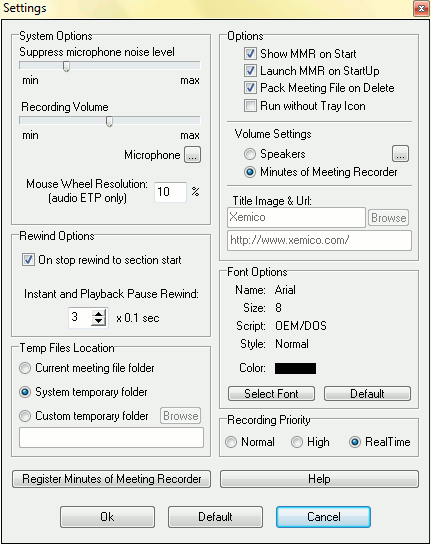
After the information fields are filled and formatted using the special font editing toolbar, click "Options" - "Settings" to customize the conference recording process.

Here we can adjust recording volume and the noise suppression level. These are the most important options in voice recording. Select your microphone and use it as the recording device by clicking the "Microphone" button. For smooth recording set "Recording priority" to "Real time" in the lower right corner of the window.
Check other settings and click "OK" when done.
Step 4: Recording the meeting.
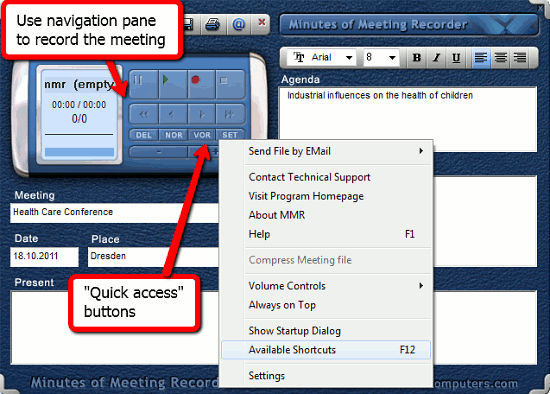
Now we can proceed directly to the recording process. The navigation pane in the upper left corner enables us to record, look through and play back the recorded audio tracks. To start, simply hit the "red dot" button and the program will begin capturing the sound. The conference recorder allows to work with multiple chapters called "sections", included in one recording project. This means that each logical part of the meeting will have its own audio track, however it will be represented as a part of the whole meeting recording.

After recording necessary parts of the conference you can hit "Stop" to finish recording and start a new track. When the conference is over, simply click "File" - "Save as" to save all recorded tracks as a part of a project. If you click "File" - "New" you will be able to begin recording a new meeting with new agenda, preferences, etc.
The "Quick access" buttons under the recording navigation controls allow us to get to the most used functions faster, without using menus and toolbars.
Step 5: Edit recorded audio.
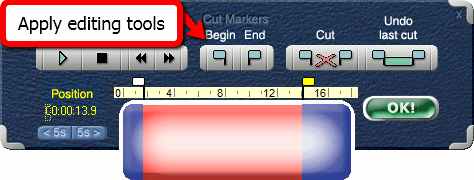
After recording all tracks we can do some audio editing. Simply click "Edit" - "Audio editor" on the toolbar:

A simple editor will pop up. With its help you can change the beginning and the end of a recording using the timeline and markers. Play back, cut and save the edited lecture recording with a few clicks. Click "OK" to return to the main window.
After saving your project you will get a nicely organized recording of the meeting with excellent sound quality.
The trial version of Minutes of Meeting Recorder can be tested during 42 days of its evaluation period. Also you will be able to record only one minute of each audio section in one meeting. If you like the program, you can register it and use without any limitations.
Search
Related
- How to record a song?
- How do I record from microphone?
- How to record my voice to MP3?
- Voice recorder with silence detection
- How to record Skype calls?
- How do I record sound on my computer?
- How do I remove copy protection from music purchased online?
- Remove DRM Copy Protection
- How do I convert my LPs to MP3?
- Audio Record Wizard 3.99 review
- Tunebite Review
- How to play several audio files?
- Re-Recording Protected Music Files Now Even Easier
Ask our expert
- How to share screen videos online?
- How to sort duplicate music files by ID3 tags?
- How to get quick updates on movies by director?
- How to convert multiple MIDI files into an MP3?
- How to rotate videos?
- How to convert WMA to WAV?
- How to play MIDIs on an iPhone?
- How to split an audio file into equal parts?
- How to split m4b audiobooks into chapters for free?
- How to convert videos for You Tube?


