How do I tag MP3 files with ID3 data using filenames?
Introduction.
ID3 headers contain various useful information about audio files, which includes title, artist, genre, year of publishing, track number, comments, lyrics, album art etc. This information is important if you want to sort your collection, or find a particular song, or create a list of all songs written (or performed) by your favorite artist. Most audio players are able to recognize ID3 data and to show it while playing, so you can see title, artist, and other relevant information on its display.
So, ID3 tags are very handy, especially for large collections. But what if your files don't have them? Would you need to tag MP3 files with ID3 data manually?
There is a better solution. To bring order to your collection with a few clicks, you will need only a powerful ID3 tagger, like mp3Tag Pro.
If the filenames already have necessary information, we can extract ID3 tags from filenames.
Step 1: Download and install the program.
Download mp3Tag Pro to a known location. Run setup and follow its instructions to install the application.
Step 2: Launch mp3Tag Pro. Select MP3 files to tag.
Double-click the desktop icon to start the MP3 tag editor (alternatively you can right-click the folder with audio files in Windows Explorer and select "Edit tags" from context menu).

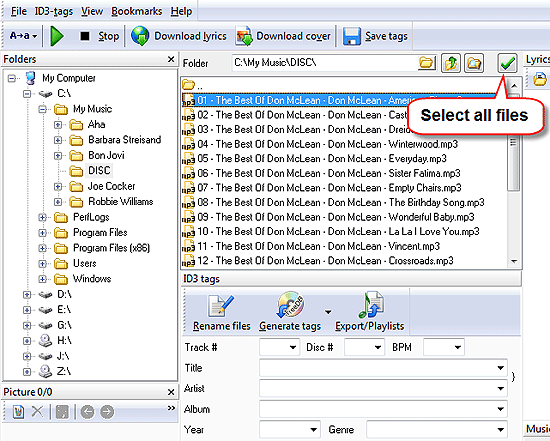
The upper part of the program together with the left part is a simple file browser. You can either enter path to your files directly in the address field, or navigate to your files like in a usual Windows Explorer window.
Once you have reached the folder with your MP3 files, select the files that you want to tag. To select all files in the folder, use "Select all" button (see the screen shot above). It is also possible to select files one by one by keeping "Ctrl" key pressed and clicking the files that you want to edit.
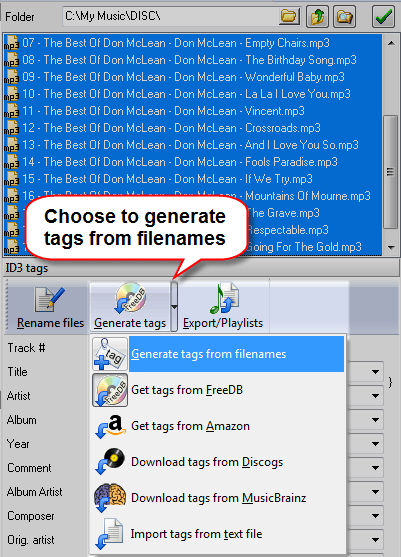
Finally, click "Generate tags" button.

Step 3: Extract ID3 data from filenames.
A new window will appear.

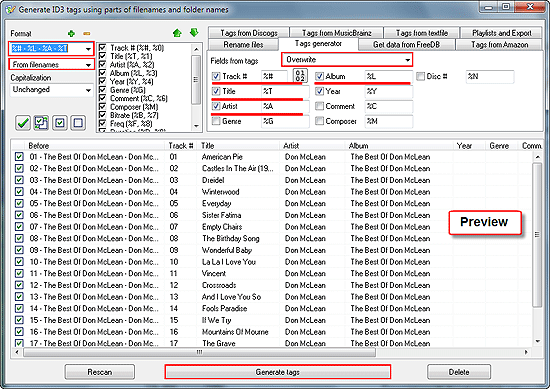
Take a look at the "Format" area in the left upper corner. Here you tell the program how it should read filenames (make sure that "From filenames" is shown in the second drop-down list, like on the screen shot above). I have chosen a pretty complex format string:
%# - %L - %A - %T
What does it mean?
Well, '%' means that the next symbol is a variable (you can also add custom strings). All variables are listed on the right to the "Format" area. You can easily find there, that '%L' refers to the name of the album, '%#' is track number, and so on. As my filenames have the following format: "track number - album - artist - title", - following the pattern, I assemble the string: "%# - %L - %A - %T".
You can use folder names to create ID3 tags, we would need to write %L\%# - %A - %T, if our folder would be the same as the name of the album.
Feel free to experiment with the format string. Results will be shown immediately in the preview area (the lower part of the window).
The most popular format strings are available in the drop-down list. Registered users can create their own presets.
Finally, click "Generate tags" button below to save the newly created tags. The saving process will take some time, as the system needs to overwrite every selected file to supply it with the ID3 headers.
The power of this method is obvious. You can tag thousands of files at once, if their filenames or folder structure follow some rules.
The trial version of mp3Tag Pro doesn't have any limitation that would prevent you from tagging your files using the method above.
Search
Related
- How to sort duplicate music files by ID3 tags?
- How to add cover art to an mp3 file?
- How to rename a batch of audio files?
- How to find all songs on your PC
- How to import ID3 tags from CSV?
- How to find MP3 duplicates by sound?
- How to fix ID3 tags?
- How to export ID3 tags to MS Excel?
- How to edit FLAC tags?
- How to download FLAC lyrics for free?
- How to add track numbers to ID3 tags?
- Duplicate File Finder for Music
- How to extract MP3 tags from filenames?
- How to download MP3 lyrics for free?
- How to remove music duplicates?
- How do I find duplicates in my music collection?
- How to rename MP3 files using ID3 tags?
- What ID3 tag editor can edit WMA tags?
- How to edit AAC tags?
- How to download MP3 album art?
- How do I get ID3 tags from the Internet?
- How to download lyrics for songs?
- How do I tag MP3 files with ID3 data using filenames?
- How do I sort MP3 files? I want to organize my music collection.
- How to keep track of my borrowed music albums?
- How to make a catalog of my music collection using album barcodes?
- How to get the biography of an artist?
- How to manage my music collection on a Dune HD media player?
- How to organize my music collection?
- How do I organize my music collection?
- How do I remove duplicates on my computer?
- How to create a playlist?
- Media Catalog Studio 4.5 review
Ask our expert
- How to share screen videos online?
- How to sort duplicate music files by ID3 tags?
- How to get quick updates on movies by director?
- How to convert multiple MIDI files into an MP3?
- How to rotate videos?
- How to convert WMA to WAV?
- How to play MIDIs on an iPhone?
- How to split an audio file into equal parts?
- How to split m4b audiobooks into chapters for free?
- How to convert videos for You Tube?


