How to make a menu for DVD?
Introduction.
Everyone of us got used to DVD menus and the simple way to access the video disk features that it provides to us. The episode selection with a bright charming background looks so amazing on a TV screen. Probably you have already wondered if you can create a DVD menu for your family party video, for example. The answer is "Yes" if you use a special DVD menu creator program like Xilisoft DVD Creator.
Step 1: Download and install the program.
Download Xilisoft DVD Creator to a known location. Run setup and follow on-screen instructions to install the application.
Step 2: Start the program. Add video files to DVD project.
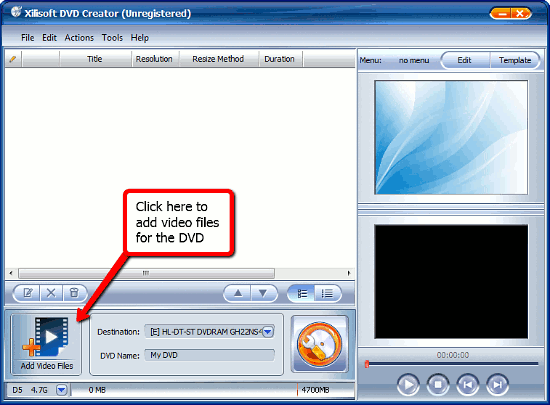
Launch Xilisoft DVD Creator. The main window will be shown:

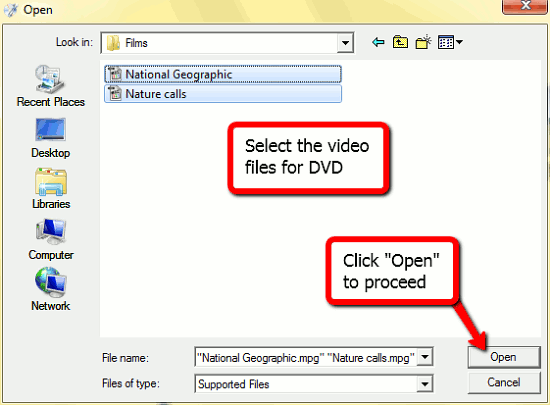
This is the window with the contents of our DVD that we are going to burn with a navigation menu, currently blank. So, we need to add video files to the project. Let's do this by clicking on the "Add video files" button. A usual "browse" window shows up:

Simply select videos to be burned to DVD and click "Open".
Step 3: Adjust settings. Create DVD menu.

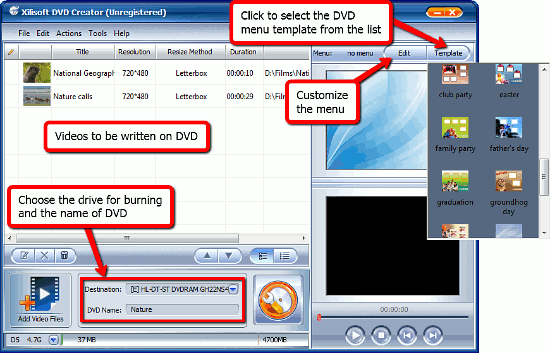
The videos will appear in the list. Now we may want to adjust a few settings in the lower part of the screen. If you have several DVD drives, the correct one can be selected in the "Destination" field. Additionally you can specify a name for your DVD.
Now let's take a look at the right part of the Xilisoft DVD Creator window. In the lower right corner, a preview area is located, here you can run through the videos in the list. The upper right corner enables us to do exactly what we need: create a DVD menu.
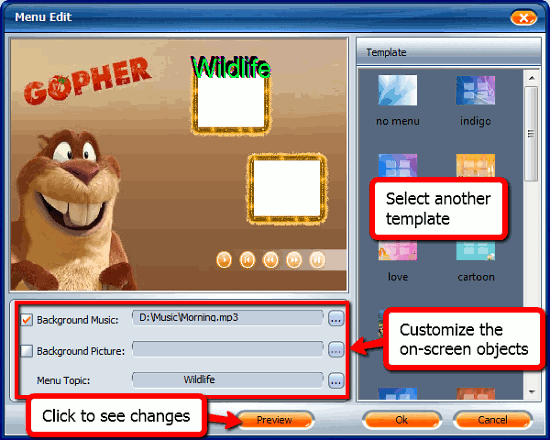
The button in the "Menu" area is divided into two parts: Template and Edit. Firstly, let's pick a template. It will define the background and the whole design of the menu interface. Just click on "Template" and select a template from the illustrated drop-down list. The menu preview window will change accordingly to show the selected template. Now it's time to customize the DVD menu. Click "Edit". A new window will emerge:

This is the DVD menu editor window. Here we can preview the templates selected on the right and any changes made using the button in the lower part of the window. We start with the template that we selected before, and the first field in the "Customize" area suggests that we set a background tune to be played while the menu is shown on a TV screen. Click on the "..." button on the right to browse and select an audio file. The "Background picture" field allows us to replace this default beaver image with any other one, for our example we just keep it so. In "Menu Topic" you can enter any text, and it will appear in the DVD menu title. Consider clicking "Preview" each time you make some changes in order to see them on the preview screen.
Click "OK" to apply your changes. Now all is set to be burned to a blank DVD, so simply click the "Start burn" button at the bottom of the program window to burn your DVD with menu.
The trial version of Xilisoft DVD Creator adds a watermark to the video that is burned. If you like the program and its functionality, you can register it and remove this limitation.
Search
Related
Ask our expert
- How to share screen videos online?
- How to sort duplicate music files by ID3 tags?
- How to get quick updates on movies by director?
- How to convert multiple MIDI files into an MP3?
- How to rotate videos?
- How to convert WMA to WAV?
- How to play MIDIs on an iPhone?
- How to split an audio file into equal parts?
- How to split m4b audiobooks into chapters for free?
- How to convert videos for You Tube?


