


How do I convert FLAC to MP3?
Introduction.
If you find the theory blah-blah-blah boring, feel free to skip to Step 1.
FLAC stands for Free Lossless Audio Codec. Lossless means that no quality is lost while converting to this format. In contrast, MP3 (MPEG-1 layer 3) is a lossy format, which means that you lose some original quality while converting to it.
So, why bother and convert FLAC to MP3? Why would we need to spoil our files?
Well, 'spoil' is not exactly the word. In most cases an average human can't tell the difference between FLAC and MP3 of a good quality. The joke is, a human ear is not that sensitive. You can probably get an impression of some difference under ideal circumstances (highest quality sound system, absolutely quiet room etc.), but how often ideal circumstances are around?
Now to the strengths of MP3 format. It contains audio in a compressed form, so the files are smaller (or much smaller) than originals. As a result, you can convert FLAC to MP3 and take more music on the same media.
And that takes us right to the second strength of MP3. Nowadays this format is supported virtually by anything. I don't know (and don't care) about toasters that are able to play MP3 files, but most other things are aware of the format. CD-walkmans, home stereos, DVD players, iPods, computers, of course. Audio in MP3 format is highly compatible, because MP3 format itself is well-established on the market.
We will consider how to convert FLAC to MP3 with AudioConverter Studio. The program offers a number of useful audio conversion tools, like FLAC converter, APE converter, MP3 converter, CD ripper etc., nicely packed into a single user-friendly interface.
Step 1: Download and install AudioConverter Studio.
Download AudioConverter Studio setup package to a known location. After download is complete, launch the program and follow instructions.
Step 2: Launch AudioConverter Studio.
Start AudioConverter Studio. Wizard shows up, suggesting us to choose what we need to do. Let's select "Convert single file or group of files from one format into other" (if not already selected) and click "Next".
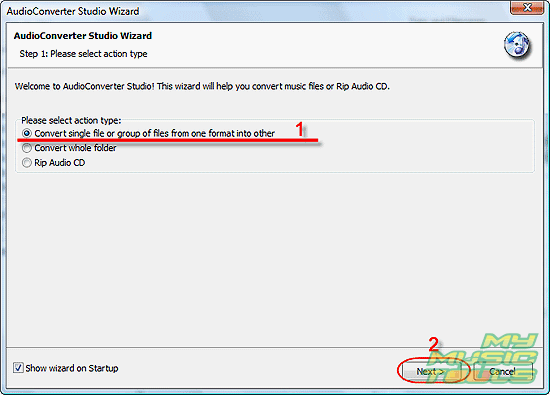
If the Wizard doesn't show up, you can call it by pressing "Ctrl" + "W" when the program's window is active, or pick it out in "File" menu.
Step 3: Select FLAC files that should be converted to MP3.
"Open" dialog appears automatically. Browse to your files and select them with mouse or arrow keys (you can use "Shift" and "Ctrl" keys in combination with arrow keys to select multiple files).
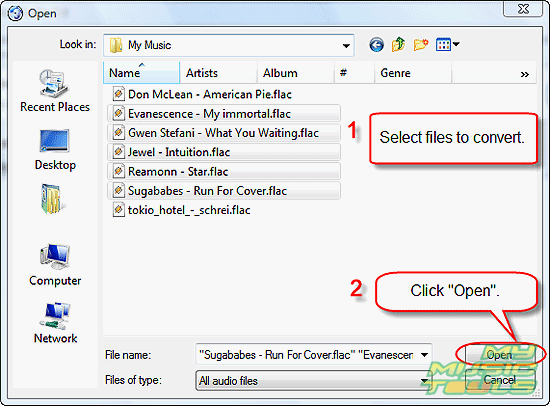
Click "Open". It will take you to the following screen:
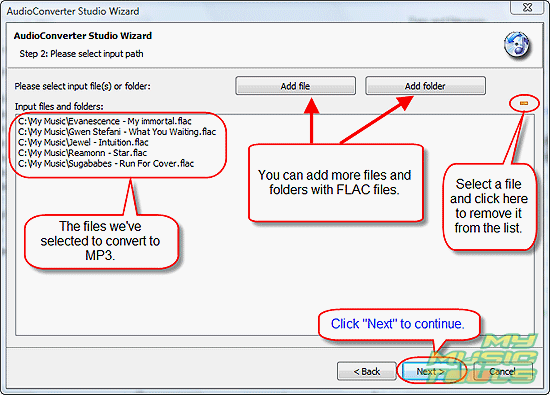
If there are more files that you want to add for conversion, use the corresponding buttons. You can also remove files from the list, if you have mistakenly added the files you don't need in MP3 format.
If the list is OK, it's time to click "Next".
Step 4: Select folder and filename format for output files.
Here you can choose where to put resulting MP3 files (1).
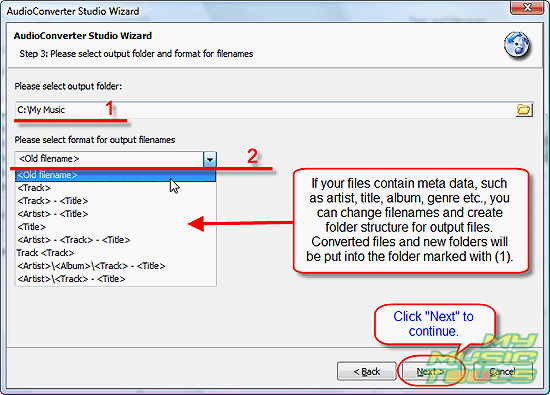
AudioConverter Studio offers another option. You can simultaneously convert FLAC to MP3 files and rename/sort the MP3 into folders created with help of meta data. For example, if you have a bunch of files with not recognizable filenames (like track01, track02 etc.), but the files contain all necessary information about artist, title etc. in meta tags (like ID3 tags), the program can:
- rename files;
- create a folder structure, like artist/album/tracks, i.e. there will be a separate folder for each artist that will contain separate folders for each album of the artist, and the album folder will contain only files from the corresponding album.
But if you only need to convert FLAC files and keep the same filenames, you can simply click "Next". As you see, "Old filename" is used by default.
Step 5: Set quality for output MP3 files.
As we have mentioned above, MP3 is a lossy format. In this step, you can choose how much should be lost. Better quality means bigger size. For music, it is not recommended to use bitrate setting under 128 Kbit/s, as it results into significant loss of quality. 192 Kbit/s is considered to sound pretty good, but you may raise the bitrate up to 320 Kbit/s.

After setting parameters, click "Next".
Step 6: Check your settings and start converting.
The FLAC converter shows a summary page:
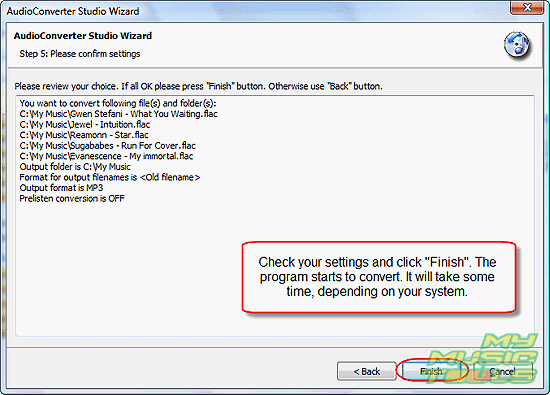
If everything's correct, just click "Finish". The program starts converting FLAC to MP3, and it will take some time, depending on your system and on how many files you've selected. There's no need to watch the process, as the rest of it is fully automatic.
After the program finishes, you can find output files in the folder that you've set in Step 4.
Search
Related
- How to convert WMA to WAV?
- How to convert FLAC to WAV?
- How to convert APE to FLAC?
- How to rip Audio CD to APE?
- How to rip Audio CD to FLAC?
- How to convert MP3 to WAV?
- How to convert WMA to MP3?
- How do I convert MPC to MP3?
- How to change bitrate of MP3 files?
- How to convert WAV to MP3?
- How to convert CDA to MP3?
- How to convert OGG to MP3?
- How do I convert APE to MP3?
- How do I convert FLAC to MP3?
- How to convert a whole folder of audio files into the OGG format?
- AudioConverter Studio 6.0 review
- AudioConverter Studio review
Ask our expert
- How to share screen videos online?
- How to sort duplicate music files by ID3 tags?
- How to get quick updates on movies by director?
- How to convert multiple MIDI files into an MP3?
- How to rotate videos?
- How to convert WMA to WAV?
- How to play MIDIs on an iPhone?
- How to split an audio file into equal parts?
- How to split m4b audiobooks into chapters for free?
- How to convert videos for You Tube?