


How do I convert MP3 to CDA?
Introduction.
A few words about common misunderstanding. CDA is a shortcut created by your operating system to mark tracks of an Audio CD. Audio CDs don't contain actual files. They use tracks instead, much the same as old LP records. To be able to deal with those tracks, operating systems create CDA labels. CDA is not a file format, so you can't convert to it in a separate step. It is created automatically as you burn Audio CD.
It is easy to convert MP3 to CDA. We will consider how to do this with help of DeepBurner Pro.
Step 1: Download and install DeepBurner Pro.
Download DeepBurner Pro to a known location. After download is complete, launch setup and follow instructions.
Step 2: Launch DeepBurner Pro and select project type.
Start DeepBurner. "Select project type:" window appears, offering you a number of choices. You should pick out "Create audio CD". Click "Next" to proceed.
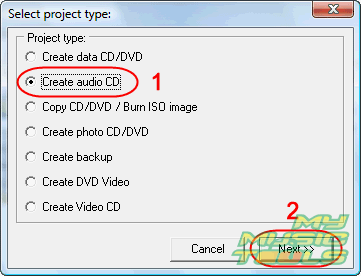
If for some reason the window doesn't show up, you can call it by clicking "New" button, or just hit "Ctrl" + "N".
Step 3: Choose MP3 files that you want to burn.
After you click "Next" in the previous step, the following window appears:
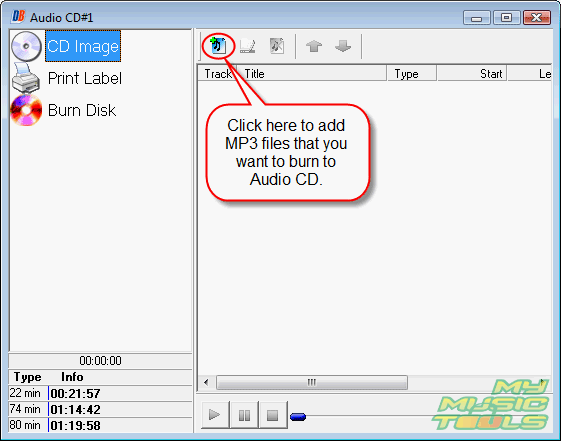
Just click the highlighted button. It will take you to "Select audio files" dialog, where you can browse to your files. Choose the files that you want to burn with mouse and click "Open".
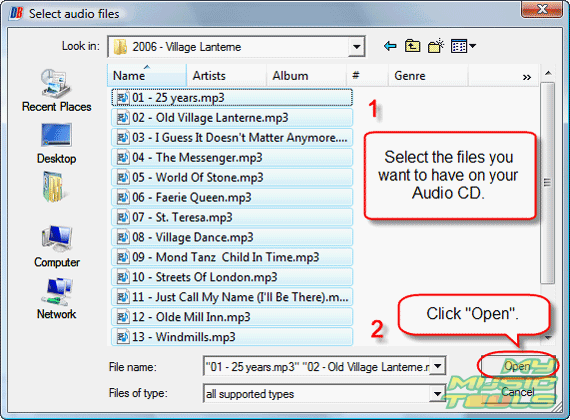
The files will be added to the project. You can repeat this step as many times as you have to (for example, if you make a selection and your files are in different folders).
Step 4: Adjust order of tracks, remove tracks that are not needed.
You have selected the files and clicked "Open". What now?
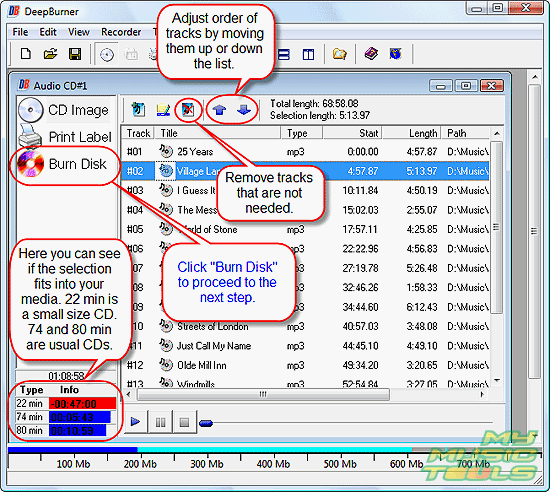
The project window is no more empty. You can see the added files, their duration and position in the track list. A few things are possible here:
- You want to change the order of tracks, for example, to put the second track as the first. It's easy. You should simply click it with mouse and use up and down arrows to move it in the list.
- The songs don't fit onto your CD. Basically there are three types of CDs: 22 minutes, 74 minutes, and 80 minutes media. 22 minutes is a small size CD, while the other two are pretty usual and look exactly the same. You should check surface of your CD, or its pack, for capacity information. If the songs don't fit, the corresponding field in the right lower corner is shown in red. You should remove some songs from the list to turn the corresponding field into acceptable blue.
- There's enough place for more music. For example, on the screen shot above, you have 10 minutes and 59 seconds of free space on a usual 80 minutes CD. If you make a selection of your favorites, you may want to use this space as well. Just repeat the step 3 and choose more MP3 files.
Step 5: Burn it.
DeepBurner Pro offers you a number of additional functions, for instance, you can print a CD label, but we will skip it now. Click "Burn Disk" on the left pane, which brings you to the following window.
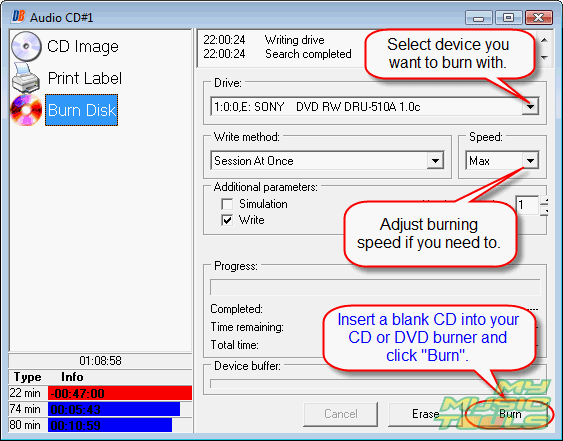
Here you can select your favorite burner device (nowadays there can be two or more on one system), adjust CD burning speed (maximum is always good, but if you have an older device or low quality CDs, you may want to burn at lower speed in order to be able to enjoy the music later).
Finally, insert a blank CD (if not done before) and click "Burn". The rest will be done by the program automatically.
Search
Related
Ask our expert
- How to share screen videos online?
- How to sort duplicate music files by ID3 tags?
- How to get quick updates on movies by director?
- How to convert multiple MIDI files into an MP3?
- How to rotate videos?
- How to convert WMA to WAV?
- How to play MIDIs on an iPhone?
- How to split an audio file into equal parts?
- How to split m4b audiobooks into chapters for free?
- How to convert videos for You Tube?