


How to organize video files?
Introduction.
Most people have various sorts of video files on their computers. Typically they are home videos, various clips (for example, shared by friends), movies in a number of different formats. With just a few videos, one does not feel the need to create a catalog of such files. But if there are dozens or hundreds of videos, organizing them can save pretty much time and provide some powerful tools.
We will use an advanced movie organizer program, Movienizer, to create a catalog of our video files in several clicks.
Step 1: Download and install the program.
Download Movienizer to your computer and start the downloaded file. Follow instructions of the setup wizard to install the movie organizer.
Step 2: Start the program. Create a new database.
Launch Movienizer. The main window of the program will be shown:

Right from the start, Movienizer shows a certain number of movies and actors. This is its demo database, it can be used to check some most commonly used features of the program. However, we do not need the movies, so let's create our own database. Select "File" - "New database":

A usual "Save as" Windows dialog will pop up. Browse to the folder where you keep your data and enter some name for the database file. Click "Save".
Now we are ready to add our own video files.
Step 3: Scan and add video files.
On the toolbar of Movienizer, click the leftmost button, "Add movie":
![]()
A new window will be shown. Here we see that we can add movies in 4 different way, but we need the last one, "From files and folders" (1):
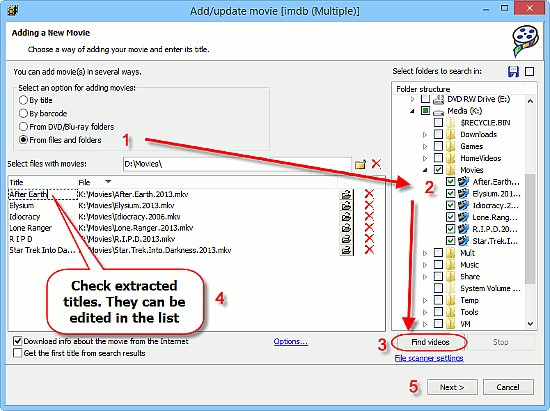
After we select this option, a "Folder structure" area will appear on the right (2). Select folders that you want to scan for video files and click the "Find videos" button at the bottom of the area (3).
Movienizer will scan the selected folders, adding all video files that it finds to the main list (4). The program tries to extract movie titles from filenames. If some titles are not correct, you can edit them directly in the list. Just click on the corresponding title and make necessary adjustments.
When everything is correct, click the "Next" button (5).
Step 4: Download information about movies.
By default, Movienizer starts looking up information about the movies you add on the internet. Of course, this will not work for home videos, so you can simply disable the "Download info about the movie from the internet" box when adding your home videos. For them, you will need to enter information manually.
For regular movies, however, everything is quite easy.
A list of search results will be displayed for the first movie you add:

You can select the correct result from the list and click "Next".
If your movie titles are pretty unique and correct, you can easily skip selecting movies from search results by activating the "Get the first title from search results" feature at the bottom of the "Add movie" window.
Step 5: Organize your videos.
After downloading information about all video files from the list, Movienizer will close the "Add movie" window. Now you can enjoy working with your movie catalog:

Movienizer has a number of features that allow sorting your movies in many different ways, browse them by actors or directors, playing videos directly from the catalog, print reports, etc. There is also a powerful plugin that allows renaming video files.
With the free trial version of Movienizer, you can add up to 50 films into one database. If you like the features, you can register the movie organizer and remove all limitations.
Search
Related
Ask our expert
- How to share screen videos online?
- How to sort duplicate music files by ID3 tags?
- How to get quick updates on movies by director?
- How to convert multiple MIDI files into an MP3?
- How to rotate videos?
- How to convert WMA to WAV?
- How to play MIDIs on an iPhone?
- How to split an audio file into equal parts?
- How to split m4b audiobooks into chapters for free?
- How to convert videos for You Tube?