


How to convert MIDI to MP3 using several SoundFonts?
Introduction.
MIDI stands for Musical Instrument Digital Interface. First introduced in 1982, the protocol was designed to synchronize and control electronic musical instruments. You can easily connect a synthesizer to your computer using MIDI and let the computer play complex pieces on the synthesizer without even touching the synthesizer's keyboard. Please note that you can play the very same MIDI file on your computer and on a synthesizer and get very different sound. This happens, because MIDI files use the capabilities of the device to create music. This is different from MP3 files that offer encoded audio signals and sound just the same on all devices that can play MP3.
Why would you need to convert MIDI to MP3? First of all, many devices don't support MIDI, while almost every device can play MP3. Second, even though some devices do support MIDI, the sound produced by them may vary. On many computers your MIDI files will sound cheap and artificial. A good way to guarantee good sound would be converting MIDI to MP3.
The last, but not least. Why should we convert MIDI to MP3 with SoundFonts? SoundFonts are banks of audio samples recorded from real instruments, and thus SoundFonts usually provide better listening experience compared to the output of an average sound card. When you convert MIDI to MP3 using SoundFonts, the resulting files sound more naturally. Even better, the very MIDI to MP3 conversion process takes much less time: 10-20 faster than other methods.
Let's take a look on how we can convert MIDI to MP3 using SoundFonts with a program called MIDI Converter Studio. Here you can use several SoundFonts for your MIDI to MP3 conversion simultaneously.
Step 1: Download and install the program.
Download MIDI Converter Studio to some folder on your computer. Run the downloaded package and follow the instructions of the setup wizard.
Step 2: Start the program. Add MIDI files to convert to MP3.
Launch the MIDI converter. By looking at its main window you can easily find out what should be done as next:
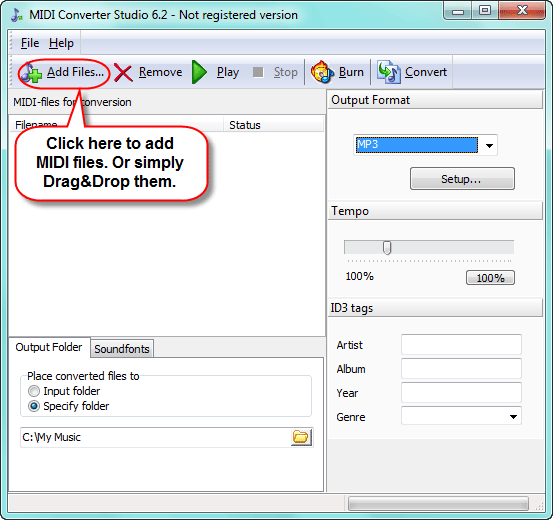
Well, some MIDI files should be added to the conversion list. Let's click the "Add files" button on the toolbar. This will produce a usual "Open file" dialog:
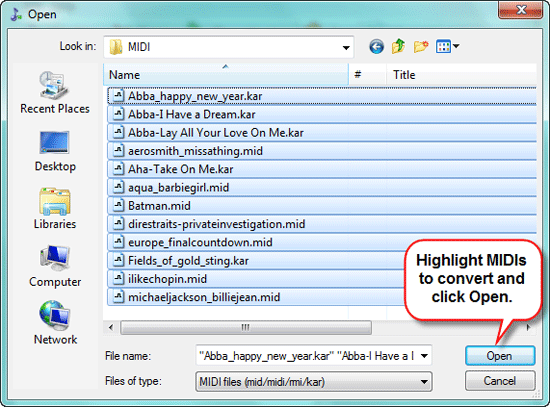
Select the files that you need to convert and click "Open". You can select all files in the folder by pressing "Ctrl" + "A" keys.
Alternatively you can simply drag and drop MIDI files that should be converted to MP3 from Windows Explorer.
Step 3: Add SoundFonts. Convert MIDI to MP3 with several SoundFonts.
Now our conversion list is populated. We can highlight any file from the list and preview it using the built-in MIDI player. The MIDI player supports SoundFonts, too, so you can preview how your MIDI will sound with this or that SoundFont.
Let's pay attention to the lower part of the window. We have two tabs here: "Output folder" and "SoundFonts". Output folder is where the converted MP3 files will be saved. Here you can choose any folder that you have necessary permissions for. Please note that Windows Vista and Windows 7 have a feature called User Account Control that prevents certain actions, even if the user has administrator privileges. I would recommend using a folder inside your profile directory (where your documents, pictures and other files are stored), as suggested by Microsoft.
Click on the "Soundfonts" tab.
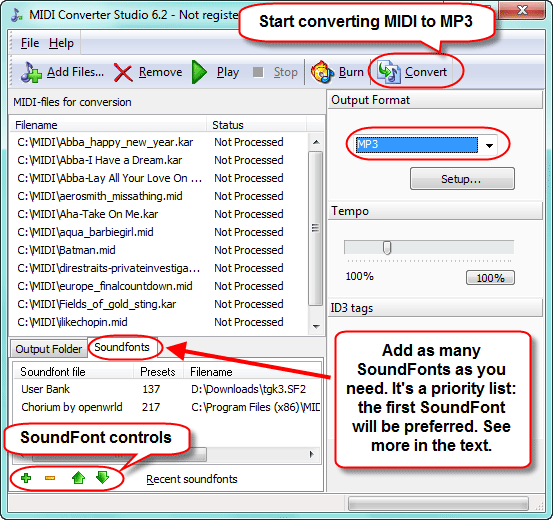
Most probably you will see only one SoundFont in the list. The SoundFont that comes with the program contains all necessary instrument samples to play or convert any MIDI file. However, you may want to convert MIDI to MP3 using other SoundFont banks. For example, you may prefer the piano sound from another SoundFont.
Here is how the program converts MIDI to MP3 with SoundFonts. Suppose you have a piano SoundFont that you'd like to use with a certain MIDI file. But the MIDI file includes also instruments other than piano, while the SoundFont doesn't contain any other samples (there are specialized SoundFonts and collection SoundFonts, the latter include samples for multiple instruments while the former contain samples for only one instrument).
So, add your piano SoundFont to the list of Soundfonts by clicking the green plus at the bottom and selecting the SoundFont file on your computer. The new SoundFont will be added after the existing one(s). Now highlight it with a mouse click and move it up using arrows at the bottom.
When converting MIDI to MP3, the program will take samples for piano from the first SoundFont in the list. For the rest of the instruments, the second SoundFont will be used.
In general, MIDI Converter Studio tries to find samples for every instrument in the first available SoundFont. If some instruments are found, it will use them. For the rest it will look into the next available SoundFont. The process will be repeated until the end of the list is reached or until all needed instruments are found.
It is recommended to have at least one collection SoundFont in the list to render all instruments correctly. You can use the one supplied with the program.
At last, click "Convert" on the toolbar to convert MIDI to MP3 using SoundFonts from the list. The converted MP3 files can be found in the output folder, as discussed above.
The trial version of MIDI Converter Studio will convert up to 60 seconds of each MIDI file. If you like the functionality of the program, you can register it and remove all limitations.
Search
Related
- How to convert multiple MIDI files into an MP3?
- How to play MIDIs on an iPhone?
- Play MIDI files on your iPod!
- How do I convert MIDI to WAV?
- How to convert MIDI to OGG?
- How to convert MIDI to WAV?
- How to convert MIDI to CDA?
- How to convert MIDI to MP3 using several SoundFonts?
- How to convert MIDI to WMA?
 How to convert MIDI to MP3
- MIDI to MP3 converter with ID3 tags support
- MIDI to Ringtone Converter
- How do I convert KAR to MP3?
- How do I convert MIDI to MP3?
- Fast MIDI to MP3 Converter 5.6 review
- How to convert a mid to mp3?
- ManiacTools Releases MIDI Converter Studio 4.6
- How do I edit MIDI files?
- WIDI Recognition System Professional 3.3 Review
- How do I convert MP3 to MIDI?
- Able MIDI Editor 1.3 review
Ask our expert
- How to share screen videos online?
- How to sort duplicate music files by ID3 tags?
- How to get quick updates on movies by director?
- How to convert multiple MIDI files into an MP3?
- How to rotate videos?
- How to convert WMA to WAV?
- How to play MIDIs on an iPhone?
- How to split an audio file into equal parts?
- How to split m4b audiobooks into chapters for free?
- How to convert videos for You Tube?