How to convert MP3 to WAV?
Introduction.
MP3 is a popular audio format that doesn't require any special introduction. It is used almost everywhere: for music, audio books, for sound tracks of videos etc. WAV is another audio format introduced by Microsoft and IBM. In fact, WAV files may contain compressed audio, but as a rule, if we speak about WAV, we refer to uncompressed audio. This means, that WAV files are pretty big. On the other hand, they are lossless, which means that no quality is lost if you convert audio to this format.
WAV is very often used as an intermediate format when converting files from one audio format to another. Most programs can work with WAV directly, but not with other audio formats. That's why you may need to convert your audio to WAV before you can use it in some program.
You can convert MP3 to WAV with AudioConverter Studio.
Step 1: Download and install the program.
Download AudioConverter Studio to a known location. Run the downloaded setup and follow its instructions.
Step 2: Start the program. Select MP3 files to convert.
Launch AudioConverter Studio. The program will offer you a wizard mode, which is perfect for new users. If you don't see any wizard, press "Ctrl" + "W" on your keyboard, or click "File" - "Show Wizard".
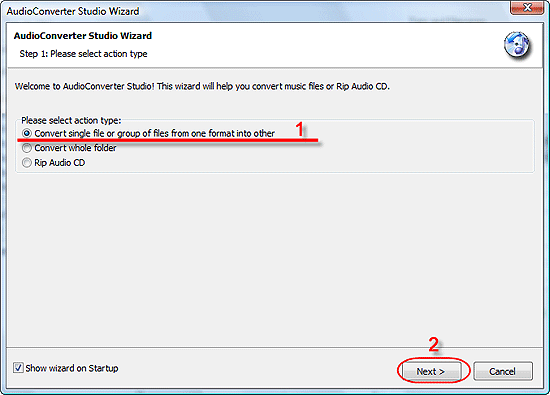
The first step of the wizard asks you about your intentions. We need to convert a single file or a group of files from one format to another, which is suggested by default. So, just click "Next".
A usual "Open" dialog pops up. Browse to the folder where your MP3 files are stored, select the files:
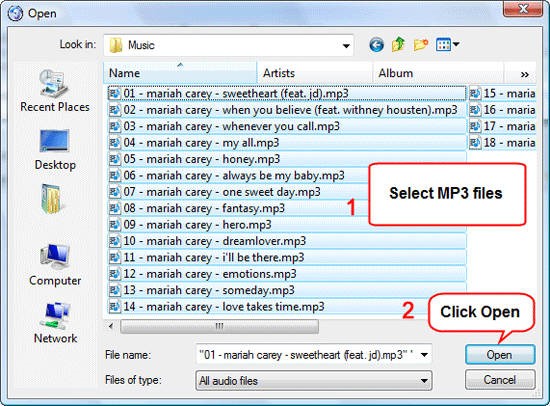
Click "Open".
The files will be added to the list:
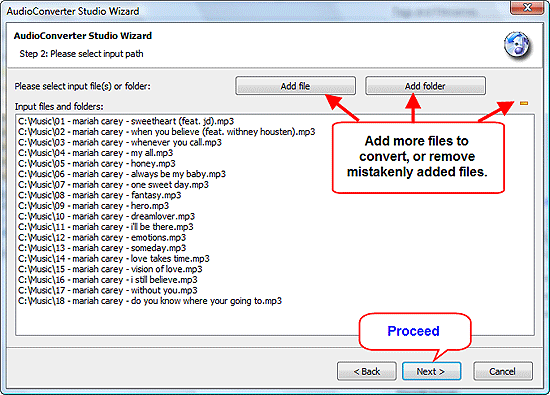
You can add more files or folders with files, or remove mistakenly added files from the list, but in most cases you won't need doing that. If everything looks good, just click "Next".
Step 3: Set output folder and filename format.
The next step of the wizard shows file-related options:
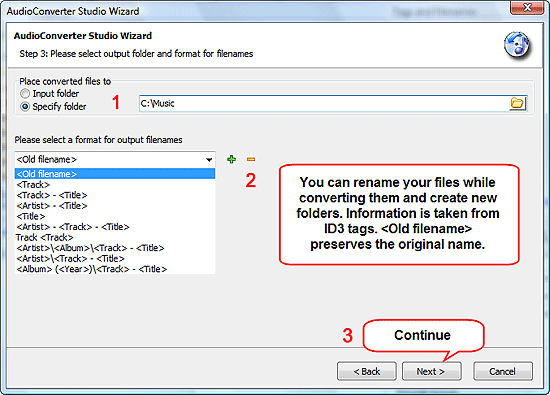
First, you need to decide where you want to save converted files. You can use "Input folder", i.e. the folder where your source files are stored, or just any other folder on your computer.
Filename format (2) is another great option. If you don't understand what it means, you can simply leave "Old filename" there, which is the option offered by default. Otherwise use the feature to sort your files while converting them. AudioConverter Studio can create new folders according to your pattern and sort files that it converts into them.
Click "Next" to continue.
Step 4: Set up output format.
As next, the MP3 converter shows a page where you can select output format-related options:
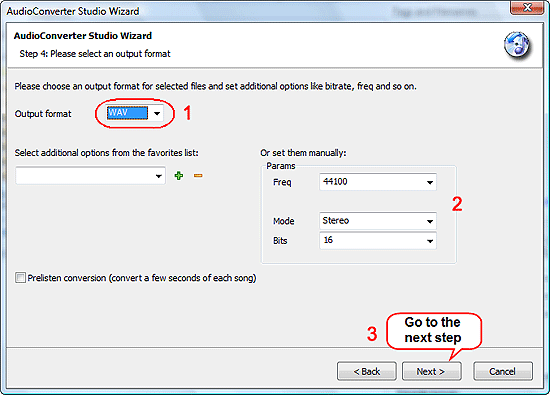
We want to convert MP3 to WAV, so let's choose WAV as output format (1). It is possible to adjust frequency and other settings (2), but we are using defaults.
Click "Next".
Step 5: Verify your settings. Convert MP3 to WAV.
At last, the wizard shows a summary page:
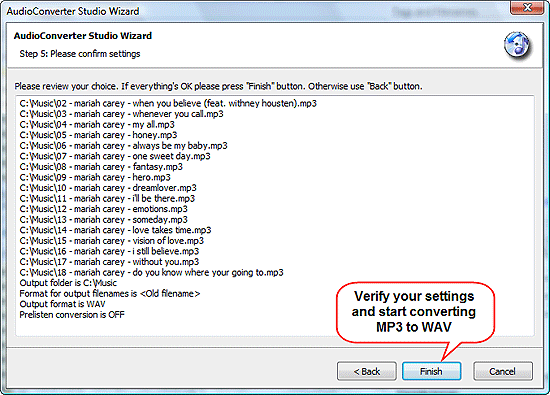
If everything is okay, just hit "Finish". This will start MP3 to WAV conversion.
The trial version of AudioConverter Studio can process up to 10 files at once. If you need to convert more files, you will need to do that in two or more turns. The full version doesn't have any limitations.
Search
Related
- How to convert WMA to WAV?
- How to convert FLAC to WAV?
- How to convert APE to FLAC?
- How to rip Audio CD to APE?
- How to rip Audio CD to FLAC?
- How to convert MP3 to WAV?
- How to convert WMA to MP3?
- How do I convert MPC to MP3?
- How to change bitrate of MP3 files?
- How to convert WAV to MP3?
- How to convert CDA to MP3?
- How to convert OGG to MP3?
- How do I convert APE to MP3?
- How do I convert FLAC to MP3?
- How to convert a whole folder of audio files into the OGG format?
- AudioConverter Studio 6.0 review
- AudioConverter Studio review
Ask our expert
- How to share screen videos online?
- How to sort duplicate music files by ID3 tags?
- How to get quick updates on movies by director?
- How to convert multiple MIDI files into an MP3?
- How to rotate videos?
- How to convert WMA to WAV?
- How to play MIDIs on an iPhone?
- How to split an audio file into equal parts?
- How to split m4b audiobooks into chapters for free?
- How to convert videos for You Tube?


