How to rip Audio CD to FLAC?
FLAC stands for Free Lossless Audio Codec. As its name suggests, it's a patent-free way of encoding audio without quality losses. FLAC files are typically bigger than MP3s, but one should take into account that MP3 is a lossy format, which means that some portion of quality is lost every time you convert any audio to MP3. With FLAC, it is not the case, and thus it is possible to encode music into FLAC and have the identical quality, compared to the source Audio CD. That (and patent-freeness) is the reason why FLAC is becoming more and more popular, and even hardware devices such as media players tend to add support for this format.
So, converting Audio CD to FLAC instead of some lossy format like MP3 can be a good idea. Let's try it with a program that can convert popular audio formats and rip Audio CDs, AudioConverter Studio.
Step 1: Download and install the program.
Download AudioConverter Studio to your computer and start the downloaded file. Follow instructions of the setup wizard to install the program to your computer.
Step 2: Start the program. Choose to rip Audio CD tracks.
Insert the Audio CD you want to convert to FLAC, then launch the program. AudioConverter Studio will show a wizard, inviting you to start converting your audio files or ripping Audio CDs. Let's choose to rip Audio CD (the 3rd option) (1):
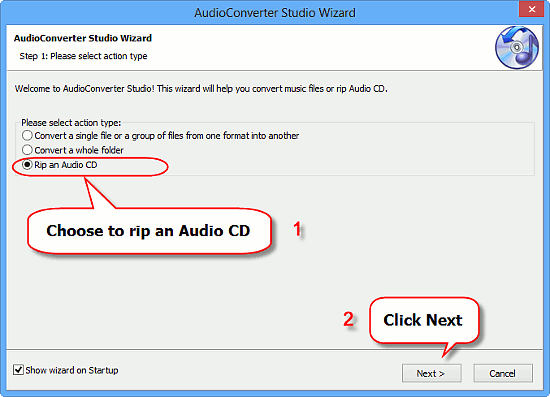
Click "Next" (2).
The CD you inserted will be read by the program, including such details as CD-Text (if available). If no information about tracks were found on the disc, AudioConverter Studio will automatically send a CDDB query and download information from the internet.
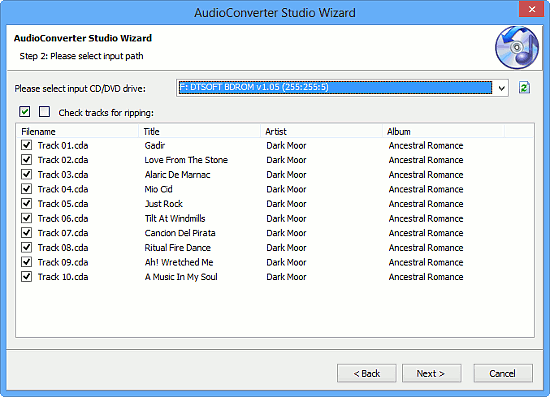
By default, the program will select all tracks of your Audio CD for converting. You can remove selection from tracks that you do not need, or simply click "Next" to convert the complete CD.
Step 3: Select output folder and format.
In the next step, you can select a folder on your computer to save the future FLAC files to (1).
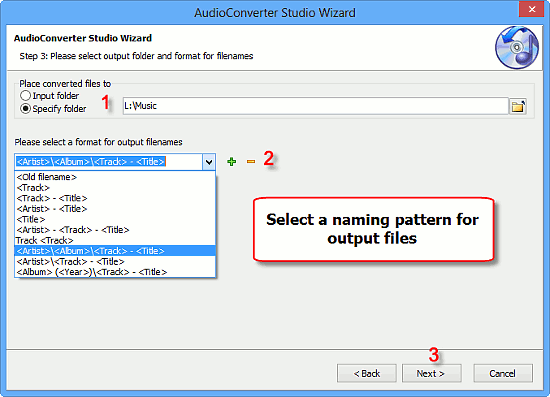
The "Input folder" option cannot be used here for obvious reasons (your Audio CD is read-only), so just select some folder on your computer. You need to have necessary permissions to save to the folder.
Below, pick out some naming pattern. For example, we selected <Artist>\<Album>\<Track> - <Title>, so our files will be named like 02 - Piece of Me.flac and saved to the folders "Britney Spears\Blackout".
Finally, click "Next".
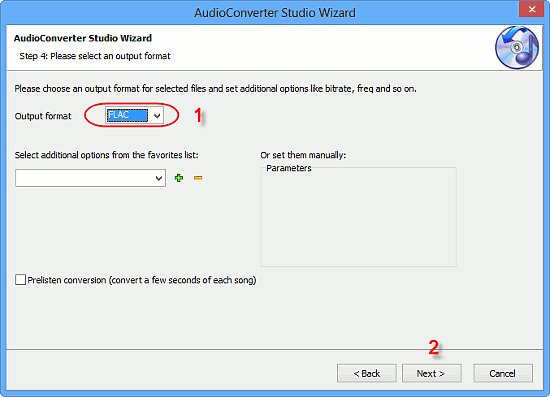
Select "FLAC" from the "Output format" field (1) and click "Next" (2).
If "Prelisten conversion" is selected in this window, only parts of your tracks will be converted instead of complete tracks.
Step 4: Convert Audio CD to FLAC.
This is the final step of the audio conversion wizard. Here you can verify all details and click "Finish" to start ripping your Audio CD to FLAC.
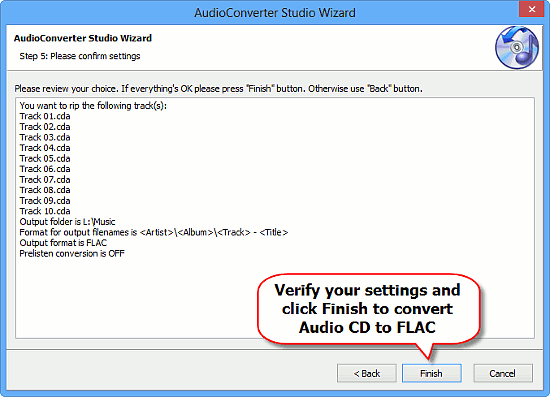
The free trial version of AudioConverter Studio converts only 10 tracks in one go, you can repeat the process as many times as you wish. If you like the program, you can register it and remove all limitations.
Search
Related
- How to convert WMA to WAV?
- How to convert FLAC to WAV?
- How to convert APE to FLAC?
- How to rip Audio CD to APE?
- How to rip Audio CD to FLAC?
- How to convert MP3 to WAV?
- How to convert WMA to MP3?
- How do I convert MPC to MP3?
- How to change bitrate of MP3 files?
- How to convert WAV to MP3?
- How to convert CDA to MP3?
- How to convert OGG to MP3?
- How do I convert APE to MP3?
- How do I convert FLAC to MP3?
- How to convert a whole folder of audio files into the OGG format?
- AudioConverter Studio 6.0 review
- AudioConverter Studio review
Ask our expert
- How to share screen videos online?
- How to sort duplicate music files by ID3 tags?
- How to get quick updates on movies by director?
- How to convert multiple MIDI files into an MP3?
- How to rotate videos?
- How to convert WMA to WAV?
- How to play MIDIs on an iPhone?
- How to split an audio file into equal parts?
- How to split m4b audiobooks into chapters for free?
- How to convert videos for You Tube?


