How to capture video?
Introduction.
There are many situations where you may need to capture video to your computer. Recording home video from a camcorder for further processing and capturing a TV show from a TV tuner card are just a couple of pretty common examples.
The process of capturing video is the same for all sorts of devices. For this article, we will take grabbing video from a webcam.
Almost every modern laptop or desktop computer is supplied with a web camera. This device is perfect for communication: cheap, smart dimensions, sufficient video quality. You cannot count on high-quality videos when recording with a webcam, but it is sufficient for making short clips or taking photos.
So, here we will capture video from our webcam using Movavi Video Suite. This is an all-in-one multimedia solution that includes quality tools for creating, capturing, processing and burning videos.
Step 1: Download and install the program.
Download Movavi Video Suite to a known location. Run the downloaded setup and follow its instructions to install the program.
Step 2: Start the program. Set video capturing options.
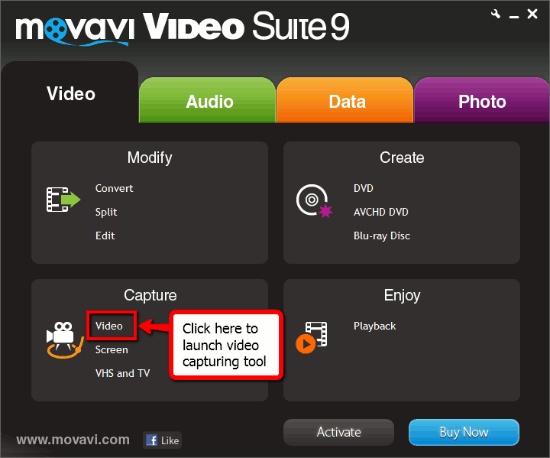
Launch the video suite. Its main window will be shown:

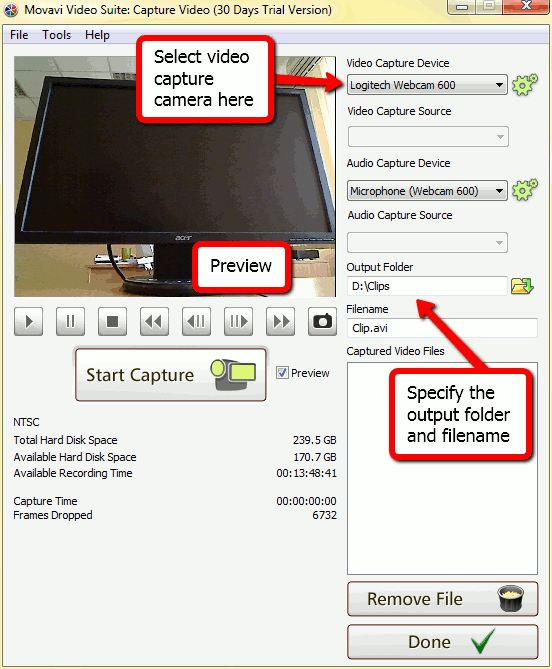
In the "Capture" area, click the "Video" tool. A new application will be started:

It will take a few seconds for the program to detect your webcam. Then it will show the real-time preview of what your camera "sees".
Though you can start capturing video right now, let's see what can be adjusted in this tool.
On the right, you can pick a capturing device if you have several of them connected. Click on the cogwheel button to adjust advanced capturing settings for the selected device.
Below, the output folder is specified. Simply click the "Browse" button and select a directory for saving captured videos.
The "Filename" field allows you to enter a name for your future video.
Step 3: Capture video clip.
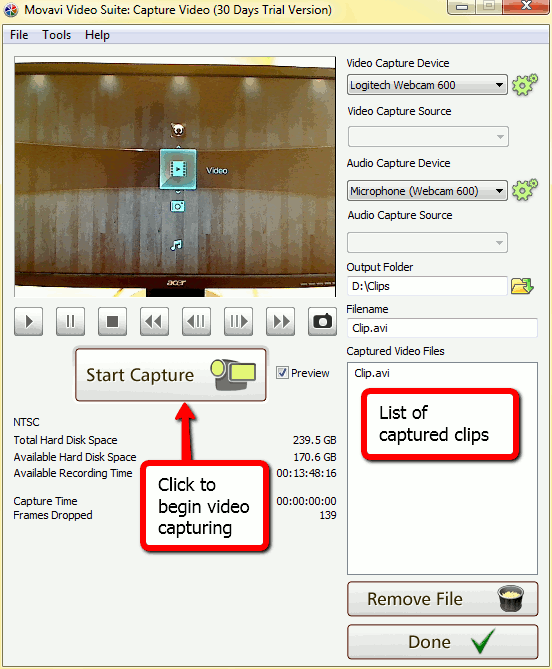
When done with settings, click the "Start capture" button. The program starts to shoot video.

Click "Stop capture" after shooting your video. The new file will appear in the list of the captured videos on the right. Here you can select a clip and delete it with a click on the "Remove file" button.
You can repeat the process to capture video clips multiple times. Finally, click "Done" to close the video grabber. Your captured videos are now stored in the output folder that you specified in the "Output folder" field.
Movavi Video Suite is an easy-to-use multimedia toolbox, you can try it for free during 30 days. The trial version adds a logo to the recorded videos. You can register the program any time to remove all its limitations.
Search
Related
- How to share screen videos online?
- How to rotate videos?
- How to capture video?
- How do I convert AVI to Zune?
- Movavi VideoSuite 4.4 review
- How to record a screen video?
- How to make a video tutorial?
 How to add a watermark to your video?
- How to fix a blurred video?
- How to increase brightness of a dark video?
- How do I combine AVI episodes into a full-length professional looking movie?
- How do I stay anonymous in a webcam chat?
- How do I improve quality of videos and old movies?
- AVS Video Editor 3.4 review
- MOVAVI Releases EnhanceMovie 2.0
- MOVAVI Releases EnhanceMovie 1.3
- How to play MKV file?
- How to play any video?
Ask our expert
- How to share screen videos online?
- How to sort duplicate music files by ID3 tags?
- How to get quick updates on movies by director?
- How to convert multiple MIDI files into an MP3?
- How to rotate videos?
- How to convert WMA to WAV?
- How to play MIDIs on an iPhone?
- How to split an audio file into equal parts?
- How to split m4b audiobooks into chapters for free?
- How to convert videos for You Tube?


