


How to rename MP3 files using ID3 tags?
Introduction.
ID3 tags are special meta information fields inside MP3 files. ID3 tags usually contain information about the file: title, artist, album, year, genre, comments etc. The majority of modern players, both software and hardware ones, can read ID3 tags and perform other operations on them (for example, a search).
There are two basic versions of ID3 tags: ID3v1 and ID3v2. The former version can contain very limited amount of information. ID3v2 is a far more advanced version, it can contain virtually unlimited number of fields, including lyrics, cover art etc.
If your files have cryptic names, like track01.mp3, track02.mp3 and so on, you may want to rename MP3 to something more readable and user-friendly. It's quite easy to do, if the files have all necessary info in their ID3 tags. All you need is an MP3 tag editor program, like mp3Tag Pro.
Step 1: Download and install the program.
Download mp3Tag Pro to a known location. Run the downloaded package and follow on-screen instructions to install it.
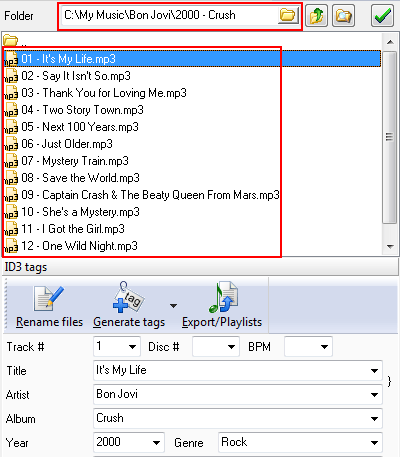
Step 2: Start the program. Select MP3s to rename.
Launch the ID3 tagger. The upper and the left parts of its main window somewhat resemble a simple file manager. There is an address field where you can type in the path to your MP3 files to rename. It is also possible to open a usual "Browse" dialog and select the folder (see the folder button). Alternatively you can navigate by double-clicking folders (to enter the folder) and by using the "Level up" button near the address field, or by selecting folders on the left.
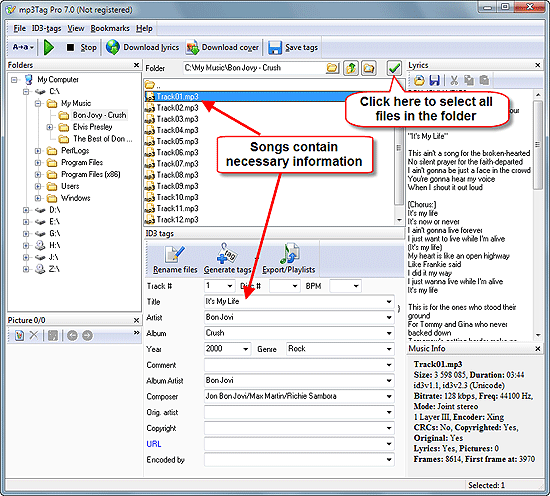
Click a file to select it. In the lower part of the window, ID3 tag information is shown. We can see that our files contain all necessary information. So we can simply select and rename then.
Click the "Select all" button in the right upper corner of the program (highlighted on the screen shot above). This will select all files in the current folder. If you want to select files in sub-folders as well, use the "Scan subfolders" button that is located next to the "Level up" button.
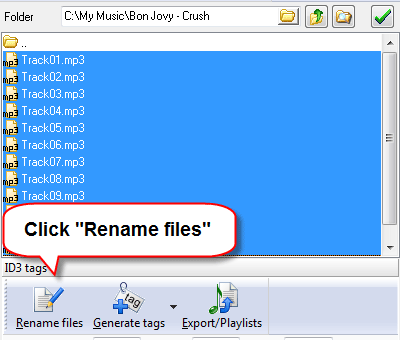
Once the files are selected, click the "Rename files" button.
Step 3: Choose filename format. Rename MP3 files.
This will open a new window:
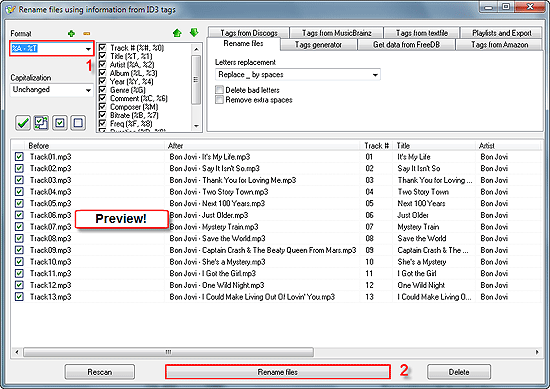
In the left upper corner of the new window, there is a "Format" field. Here you can enter any possible format to rename your files, or simply use the pre-defined formats from the dropdown list.
The lower part of the window is a large preview area. Two columns are important to us now: "Before" shows current filenames, "After" shows how filenames will look like if we apply the current format. To rename MP3 files using ID3 tags, click "Rename files" below.
In the above example, we used this format: "%A - %T". It renames our files by the "Artist - Title" scheme. We could use also other formats, for example:
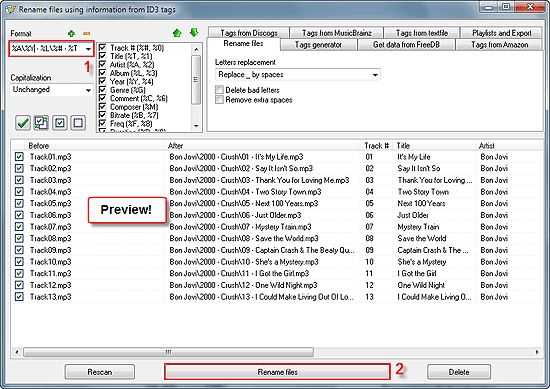
"%A\%Y - %L\%# - %T" is a bit more complex format. It not only renames files but also creates folders by the scheme "Artist\Year - Album\Track# - Title". You can see the meaning of different variables in the list to the right from the Format field.
Click "Rename files" to confirm changes. Renaming will be instant.
Now our files have informative names and are properly sorted by folders. If there were different artists and albums, all of them would be sorted into corresponding folders. We could also rename files without creating folders, like in the first example, or include more information into filenames (for example, rename them by the following scheme: artist - track# - album - title). Possibilities are virtually unlimited, because variables can be used in any succession.
If your files don't contain any ID3 tags, you can fetch this information by selecting all files from one album and using the FreeDB tab.
Search
Related
- How to sort duplicate music files by ID3 tags?
- How to add cover art to an mp3 file?
- How to rename a batch of audio files?
- How to find all songs on your PC
- How to import ID3 tags from CSV?
- How to find MP3 duplicates by sound?
- How to fix ID3 tags?
- How to export ID3 tags to MS Excel?
- How to edit FLAC tags?
- How to download FLAC lyrics for free?
- How to add track numbers to ID3 tags?
- Duplicate File Finder for Music
- How to extract MP3 tags from filenames?
- How to download MP3 lyrics for free?
- How to remove music duplicates?
- How do I find duplicates in my music collection?
- How to rename MP3 files using ID3 tags?
- What ID3 tag editor can edit WMA tags?
- How to edit AAC tags?
- How to download MP3 album art?
- How do I get ID3 tags from the Internet?
- How to download lyrics for songs?
- How do I tag MP3 files with ID3 data using filenames?
- How do I sort MP3 files? I want to organize my music collection.
- How to keep track of my borrowed music albums?
- How to make a catalog of my music collection using album barcodes?
- How to get the biography of an artist?
- How to manage my music collection on a Dune HD media player?
- How to organize my music collection?
- How do I organize my music collection?
- How do I remove duplicates on my computer?
- How to create a playlist?
- Media Catalog Studio 4.5 review
Ask our expert
- How to share screen videos online?
- How to sort duplicate music files by ID3 tags?
- How to get quick updates on movies by director?
- How to convert multiple MIDI files into an MP3?
- How to rotate videos?
- How to convert WMA to WAV?
- How to play MIDIs on an iPhone?
- How to split an audio file into equal parts?
- How to split m4b audiobooks into chapters for free?
- How to convert videos for You Tube?